Chords365 Manual
A walkthrough of the app's main features: songs, setlists, Music Director mode, team collaboration, import, drawing, projection, pedal and offline use.
Jump to the section you need
- 01Introduction
- 02Sign-in and group
- 03Home screen layout
- 04Song display
- 05Transposing & capo
- 06Drawing on sheet images
- 07Music Director mode
- 08Setlist
- 09Song library & heatmap
- 10Import: Ez az a nap! + OCR
- 11Editing songs
- 12Events & mini calendar
- 13Group management
- 14Group invitations
- 15Settings
- 16Projection, slides & pairing
- 17Pedal & keyboard
- 18Offline use & installation
- 19New Menu (Global Header)
- 20Language & Appearance (HU / EN)
- 21Group Broadcast (admin)
- 22Bug Report with Screenshot
- 23New Login Screen
- 24Media Library (Group Files)
- 25Troubleshooting
Welcome to Chords365
Chords365 is a modern virtual chord book for music teams. The app runs in the browser, requires no installation, and is completely free.
What is it for?
- Your own songs in ChordPro and PDF/image format — chords and lyrics at the same time.
- Setlists for rehearsal and performance; in team sync.
- Music Director mode: the leader's song changes and commands are visible to everyone live.
- Event calendar: who will be present on which day and at which session.
- Offline-capable during rehearsal and performance, even when the internet drops.
The manual is written so that reading it in order you'll understand everything. But if you want to quickly find a specific feature, jump to it from the table of contents.
Sign in and join a group
The app uses Google account sign-in — no separate registration, no password.
First sign-in
- Open chords365.com in your browser.
- Click the Sign in with Google button.
- Allow profile access (name, email).
- You'll be redirected to the home screen — you're in.
Joining a group
The app is used at the group level — every user belongs to at least one group. There are two paths to a group:
- Create a new group: if you don't belong to any group yet, the app shows a "Your profile is not associated with any group" screen. Click the "click here to register a new group" link, enter the group name, then press the "Create new group" button — you'll become the admin of the new group, and the app will shortly reload with your own group.
- Join with an invitation: if an admin has sent you a link, click it, sign in, and send a join request — the admin receives it by email and approves it.
See the invitation process in detail: 14. Group invitations.
Home screen: everything on one screen
After signing in, the starting screen shows several well-separated modules (widgets): my groups, quick song search, latest news, previous lists, mini calendar, events and the group's most recently active members.
Today's event
If an event is scheduled for today, a pulsing card highlighted with a TODAY badge appears at the top of the home screen (below the system message): today's date, the admin's note, and quick-entry pills for setlists linked to the event. One click takes you straight to the setlist — no need to find it in the events box. If there's no event on a given day, the card takes up no space at all.
My groups
A vertical row of buttons with your groups. The highlighted green one is the currently active group. The Manage group button at the bottom of the widget is available to all members and opens a modal. In the modal you can initiate leaving the group; group admins also see an extra Open admin management link that leads to the detailed admin interface (/group-admin).
Quick actions
The old Settings box on the home screen is gone — all functions from it (Sheet image mode, More settings, Sign out, start projection and controls) are now accessible in the modal opened by the Menu button in the header. Details: 19. New menu (global header).
What's new
The group administrator can post messages here — e.g. new songs, tagged YouTube links, rehearsal info. Editable with the icon (for group administrators).
Previous lists
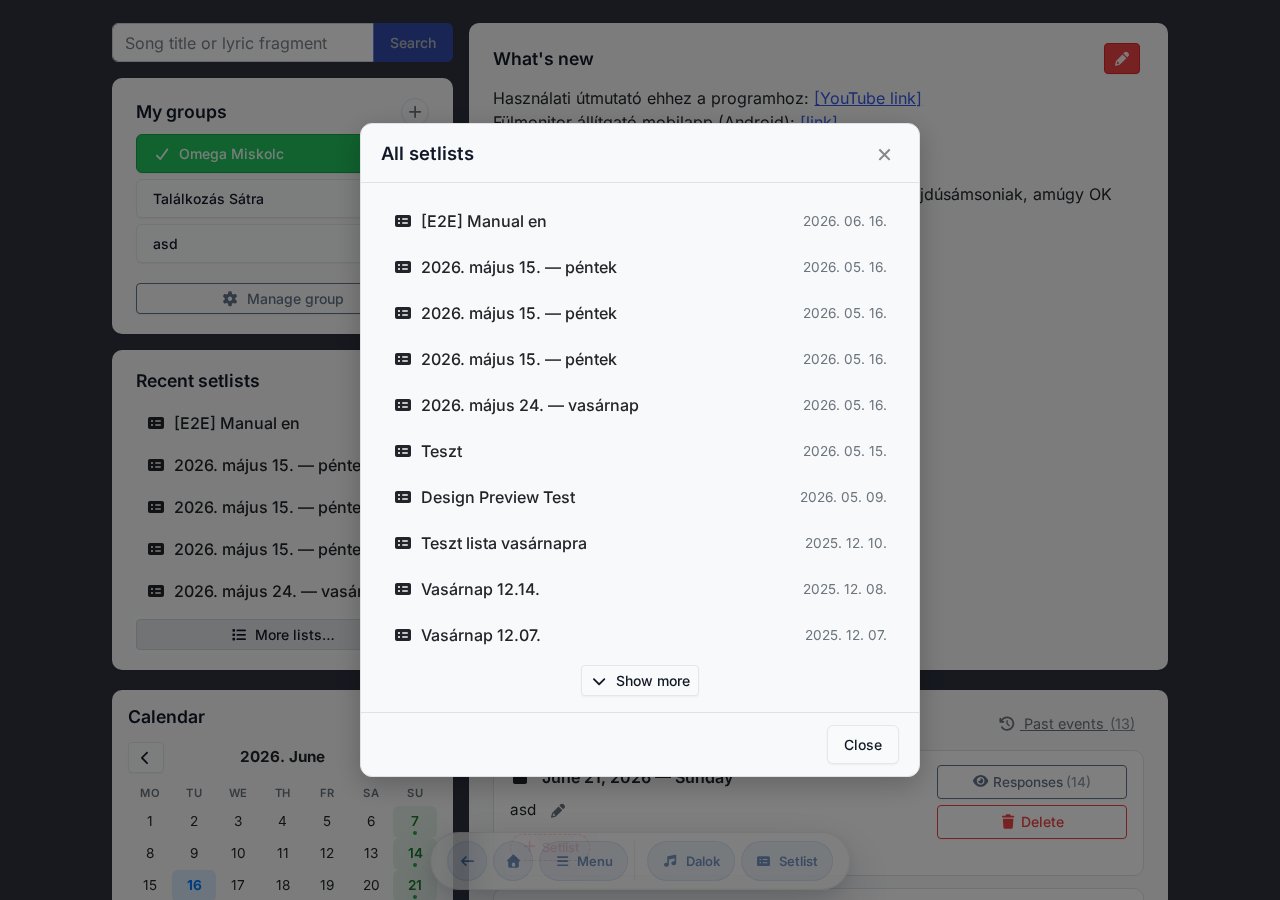
Quick links to the last 5 setlists. The More lists… button opens a modal with all setlists (loaded 10 at a time, lazy).
Mini calendar
Monthly calendar where green dots indicate days with events. Features:
- ◄ ► month navigation.
- Today button in the top right next to the title — jumps back to the current month.
- Click on a day with an event → opens the all-events modal focused on that day.
- For group administrators: click on an empty day → new event modal with the clicked date.
- New event button (admin only).
Events
On the right side (the wide column beside the mini calendar) the next 5 events are shown. The full list — past and future — can be opened with the Past events link (or by clicking an event day in the mini calendar), and appears as a modal titled All events.
Weekly reminder email
If the group administrator has enabled it, you'll receive a weekly reminder email about upcoming events in the next 30 days. The email lists sessions by group, and for each shows whether you've already responded ("You responded") or you haven't replied yet — so you can see at a glance where you still need to confirm. If there are no upcoming events in any of your groups, no email is sent. With multiple groups you still receive just one combined email.
The song page
This is the app's main screen — the chord-lyric view is displayed here, and transposing, capo, MD mode and drawing are all controlled from here.
What's on screen?
- Two-line editable note bar — the song's basic info at the top.
- Title + subtitle + (CAPO value).
- Verse / Pre Chorus / Chorus / Bridge sections — the chorus is automatically highlighted with a yellow background.
- Capo panel at the bottom right, for setting the caped key and position.
- MD command dock — in Music Director mode, a vertical panel always visible on the right side around the upper third of the screen, with 4 command buttons.
Song quick-box (in the Menu modal)
The song page's quick actions are accessible at the top of the modal opened by the Menu button in the global header, in the Song quick-box section:
- Add to setlist / Remove from setlist — if you have an active setlist and are in edit mode.
- Share — copies the song URL to the clipboard.
- Sheet image toggle — if at least one sheet image has been uploaded for the song, this toggle lets you instantly switch between the ChordPro text view and the uploaded sheet scans.
- Edit song — takes you to the editor screen.
- Stem / multitrack toggle — if the song has an uploaded stem package, this toggle switches the embedded multitrack player on/off (see below).
- Notes — opens the modal containing source URLs and free-text notes.
- Projection control mode toggle — if a projector is paired.
- Slideshow toggle — switches the view from lyrics to per-song slides that can be projected (see chapter 16).
- Song history toggle — shows/hides the history tables below the song (see below). Controls the same setting as the Show song history toggle in the Appearance modal.
- Learning mode toggle — shows/hides instrument chord charts for the song's chords (guitar, piano, ukulele; see below). Off by default.
Appearance modal
The Appearance (magic wand icon) button in the global header opens the Appearance modal, where you can configure the display under Theme, Background, Chords, Text and Features categories. These settings apply globally (to all songs), not as per-song overrides.
Links, notes modal
The Notes button in the Song quick-box section of the global header Menu modal opens a modal showing the source URLs saved for the song (YouTube link, original chart source, kotta.ezazanap.hu reference when imported) and free-text notes that can be read/edited (pencil icon). The domain is shown shortened; clicking opens a new tab.
Next song preview
If you opened a song from a setlist, an info bar at the top of the song (on the right) shows the list name and the next song title. This way at rehearsal you can see at a glance what's coming — and click to jump to it.
Sticky previous / next buttons (slide)
In setlist view, large ◀ / ▶ sticky buttons appear on both edges of the screen for jumping to neighboring songs. On tablets you can also enable the compact page-turn variant — in Settings → Features section. Works with pedal input and gestures too.
Song history
Enable the Song history toggle (in the Menu modal Song quick-box section or the Appearance modal) — then scrolling to the bottom of the song you can see when, in which list and in what key it was previously played.
Edit log
The second table below the history shows the song's editing history: who changed the chords, lyrics or metadata, and when. Useful when something disappeared from a song or a teammate made unwanted changes — you can ask them what they intended.
Stem / Multitrack player (beta)
If multiple separate audio tracks (drums, bass, guitar, keys, vocals, click, guide) have been uploaded for the song, a Stems / Multitrack button appears on the song page. Once opened, an embedded mixer interface appears:
- Per-track volume slider, Mute / Solo toggle.
- Single play / pause for all tracks — they start together, in sync.
- Key matching: if the recording's original key is known, the app adjusts the multitrack to the key set on the song in real time. Works with capo too.
- Tempo matching: similarly, if the recording's original tempo is known, it's matched to the current tempo.
- Waveform visualization: the full waveform is visible per track; click to seek.
- Track preferences (volume, mute, solo) are saved per device — it opens the same way next time.

Stem packages can be uploaded by the group administrator on the editor page — original MP3/WAV files that the system automatically optimizes for browser playback. Multiple stem sets can be attached to a single song (e.g. full mix + individual tracks).
Learning mode — chord charts
Learning mode shows instrument chord fingerings for the chords actually used in the song — no need for a separate chord reference app at rehearsal or practice. It can be toggled in the Menu modal Song quick-box section; it's off by default.

- Three instruments: guitar and ukulele fingering diagrams, piano mini keyboard (pressed notes highlighted). The instrument selector is in the panel header.
- Only the chords of that song, in order of first occurrence — and always in the currently displayed key (updates after transposing, capo and saved key).
- H/B notation: chord labels follow the configured Hungarian / standard notation setting.
- Slash chords (e.g. D/F#) get a separate fingering that includes the bass note.
- Two layouts: embedded (below the song) or floating panel. The floating panel can be freely repositioned by grabbing the header title ( icon), and its position is remembered per device.
- The on/off state, chosen instrument and layout are tied to your account and sync across devices.
- For unknown or very complex chords the panel doesn't break — it just indicates there's no fingering for that chord.
Key change with one button press
The app can recalculate chords from a ChordPro text into any key — no mental arithmetic needed.
Transposing
On the song page, use the − / + buttons on either side of the key indicator to step down or up by a semitone. Save the selected key with the Save chord button that appears below the key indicator — from that point it will open in that key next time. In setlist view it is also immediately assigned to the current list.
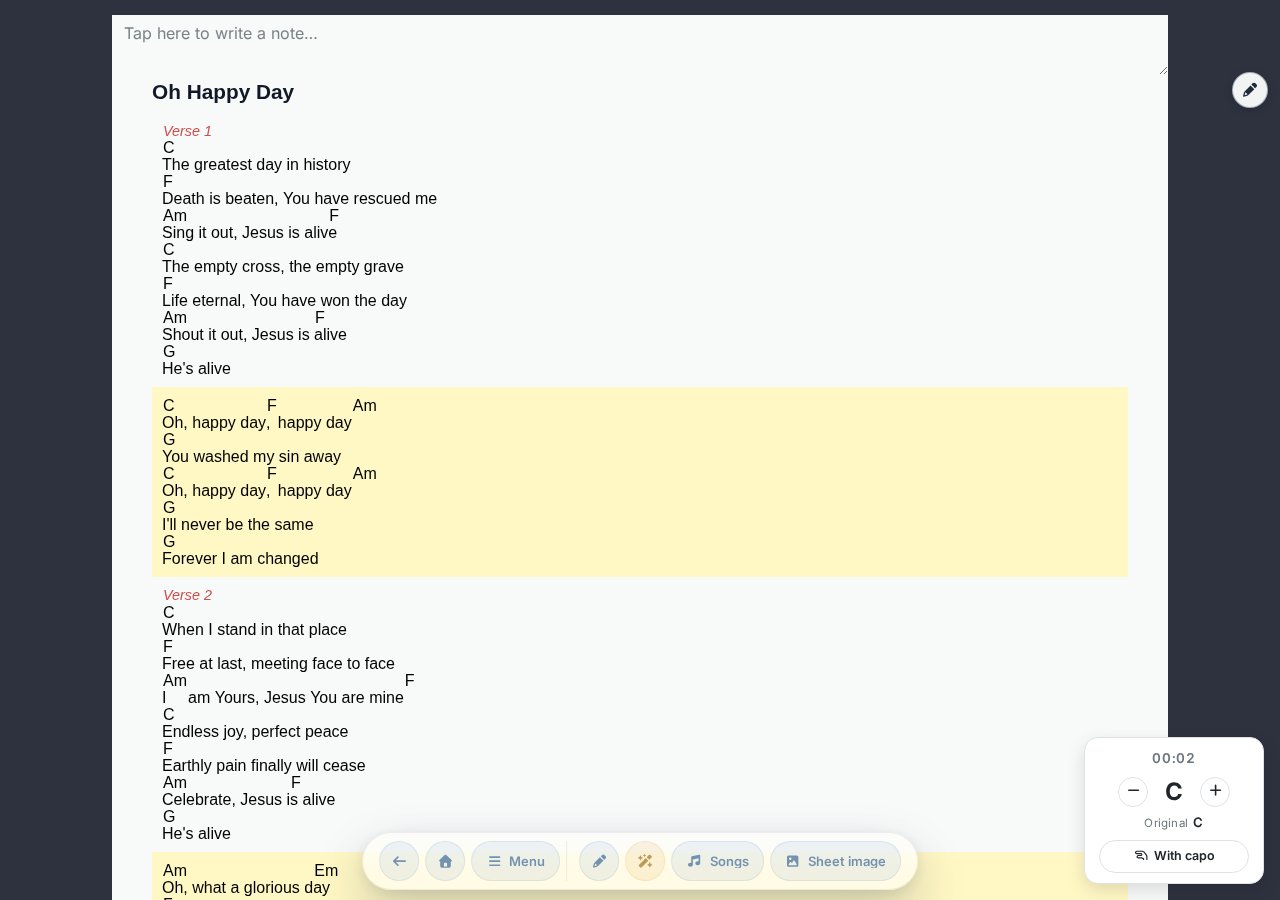
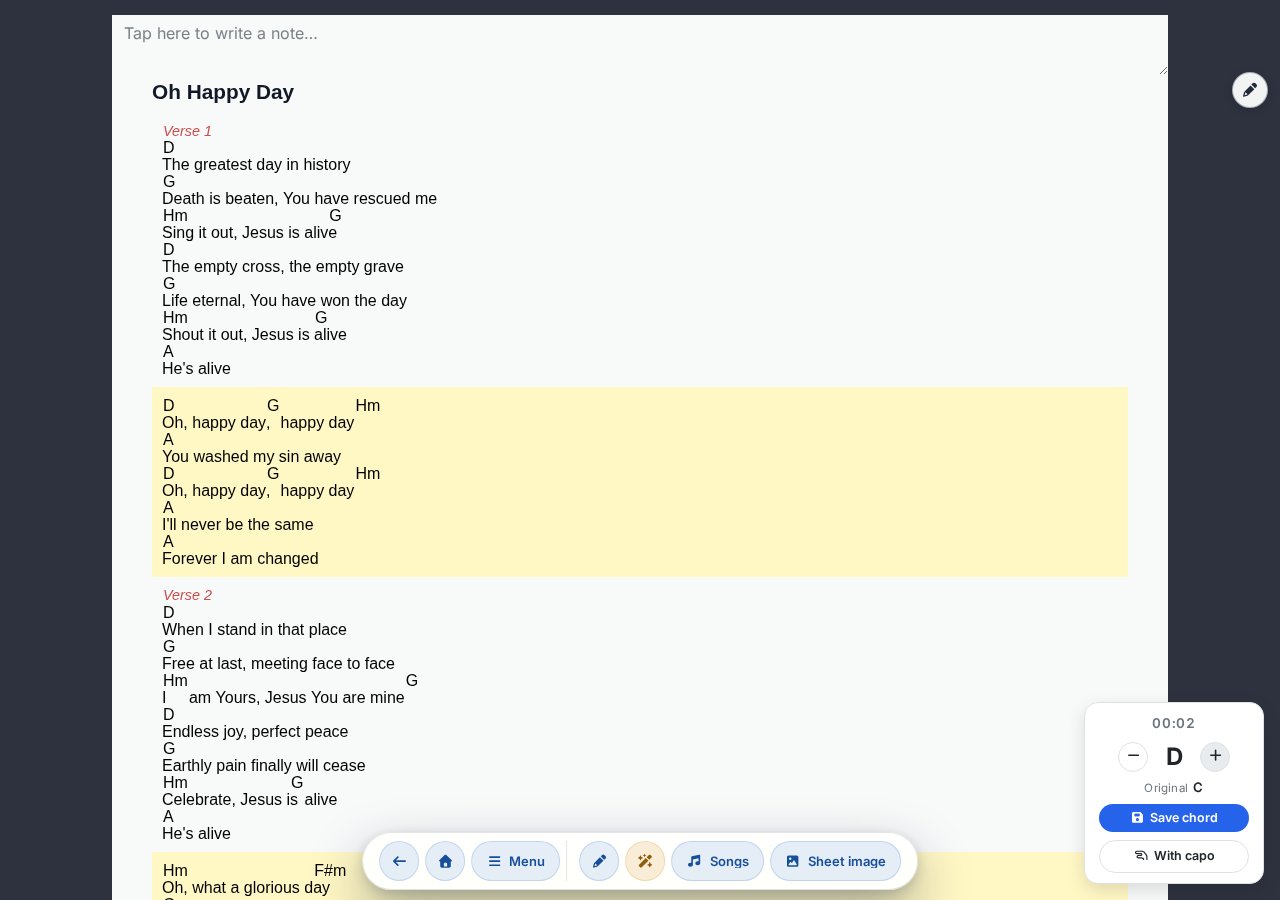
+ button presses move the chords to D; the panel shows the new key and the Original C, saveable with the Save chord button.Original and saved key
Below the transposing panel you can always read the Original key (the key written in the ChordPro file) and — if you have saved one — the Saved key, so it's easy to return to the original with the − / + buttons.
Capo
Entering the capo position sets which fret you place the capo on (typically frets 1–7 in practice), and the app calculates which key you're actually producing with simpler fingerings. A negative value can also be entered: this transposes upward as a drop tuning. The Capo button is accessible in the bottom right corner of the song; when active, the panel shows the capo position.
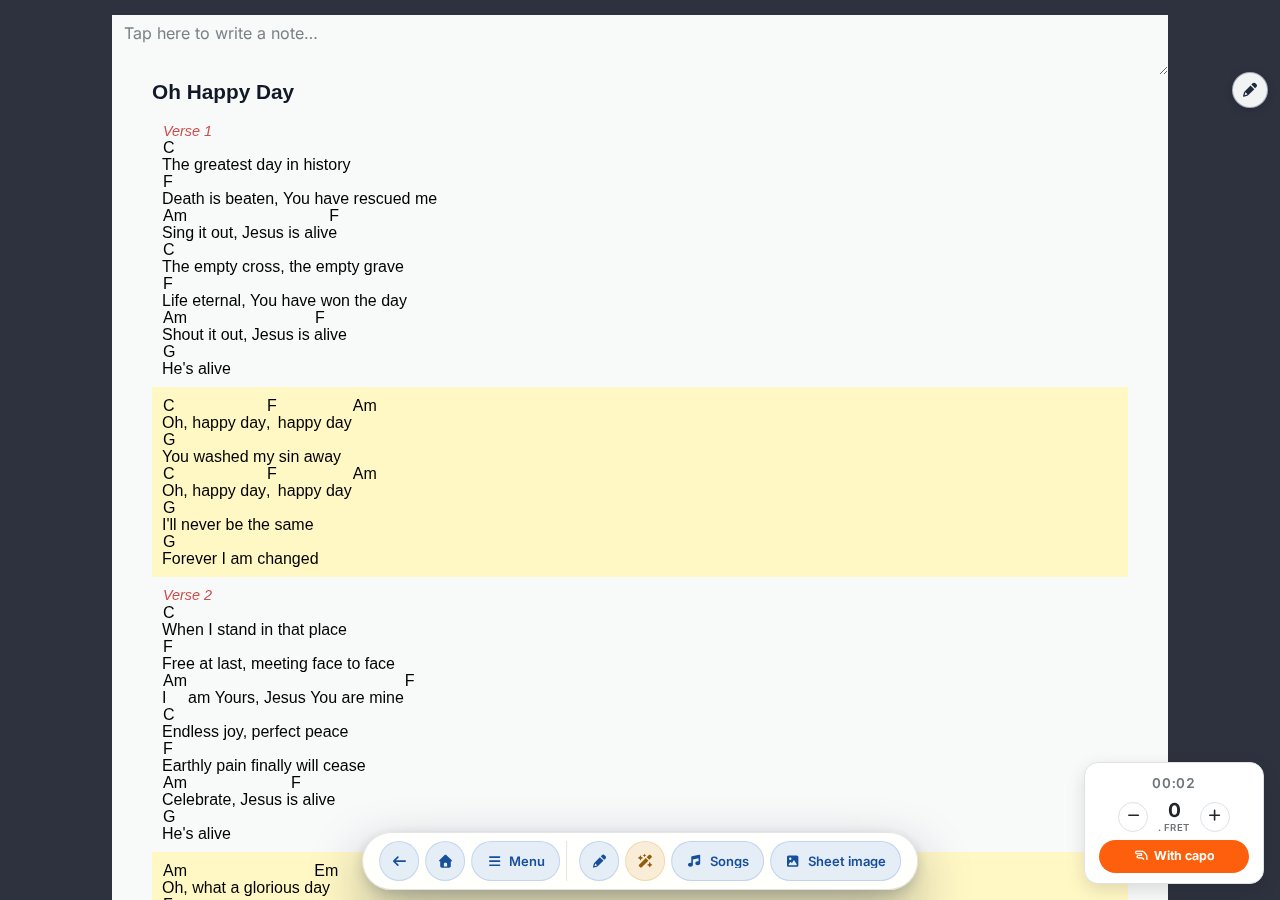
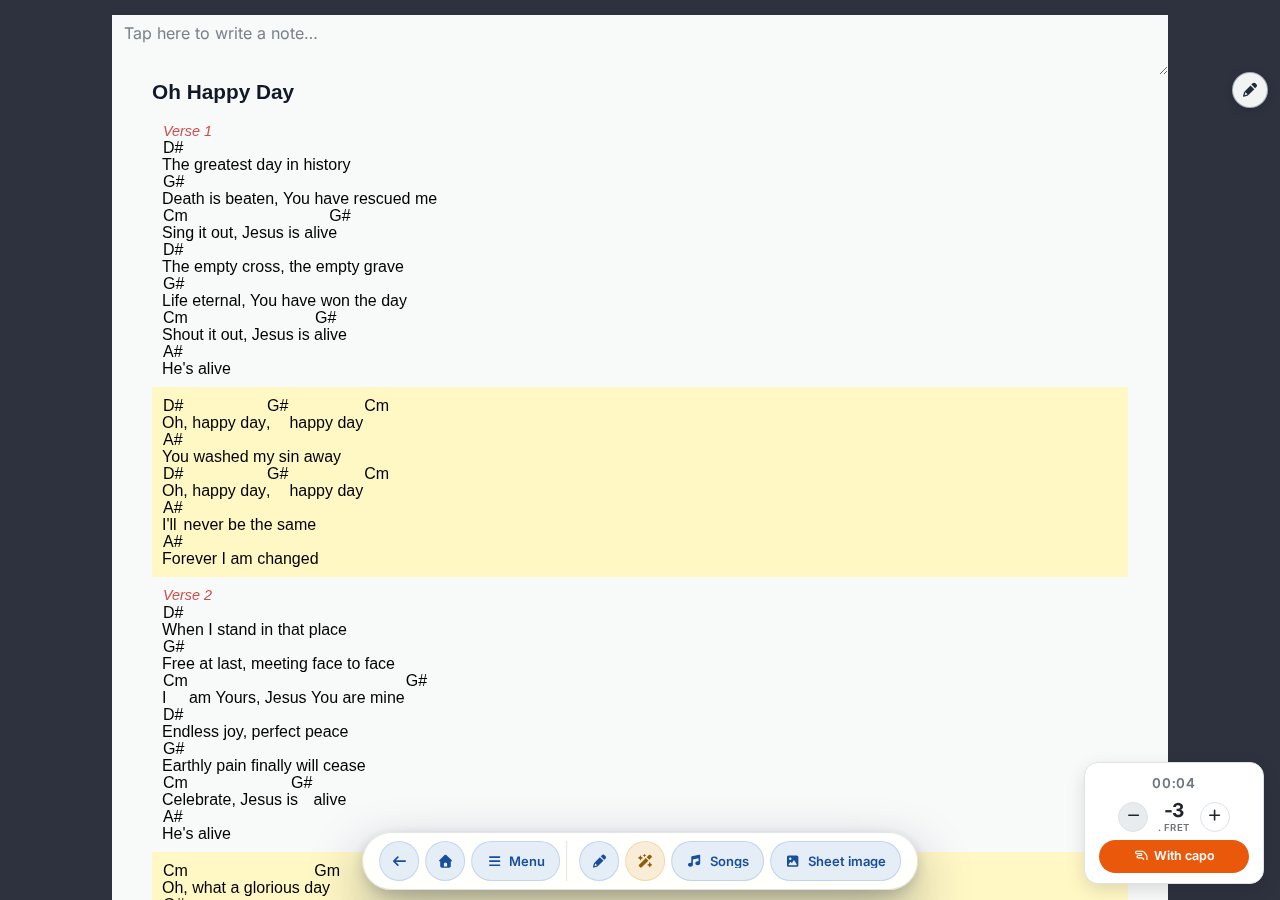
If the singer requests a key change, try capo first: the familiar fingerings stay the same, only the pitch shifts.
H or B?
In Settings → General → Notation (or in the Chords section of the Appearance modal on the song page) you can switch between Hungarian (H) and standard (B) notation. Storage is always in standard notation, so source files remain interchangeable.
Annotating with stylus or finger
You can draw on songs — accents, fingering, comments — either on the uploaded sheet image (PDF, PNG, JPG) or on the chord-text (ChordPro) view. There are two separate layers: group-level (visible to everyone) and personal (visible only to you).

Drawing tools
- Pen / eraser toggle.
- Line thickness slider.
- Color picker.
- Group / Personal layer toggle (only group admins can write to the Group layer; others can only see the shared annotations).
Enabling finger drawing
By default only a stylus can draw — a finger touch scrolls the page. The small hand icon lets you enable finger drawing. When active, finger scrolling doesn't work on the drawing area, but you can still scroll outside the chart edges.
Drawing works in chord-text view too
You can draw not only on uploaded sheet images but also on the chord-text view. Here annotations stick to the lyrics: if you view the song with a different font size, chord size, line spacing or without chords, the drawing still stays attached to the same line and word.
If most drawings were made in a different view, the app offers a discreet bar to temporarily revert to the view used when drawing for consistent display. This only affects that song, and reverts when you leave it (or manually set your own view back).
Live team sync during rehearsal and performance
In Music Director (MD) mode, the leader's song changes and commands (Stop, Continue, Return, End) appear on all the team's devices in real time.
Activating
Use the MD mode toggle in the Song and rehearsal section of the global header Menu modal to become the leader. Your own device's setlist will then show a notification: "You are currently in Music Director mode", and following mode turns off on your own device (mutual exclusion), since you are the leader.
Sending MD commands
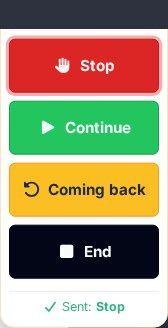
On the right edge of the song page, around the upper third of the screen, a vertical MD command dock (with a megaphone icon) appears, always visible in MD mode, with four command buttons:
- Stop — pause signal.
- Continue — restart signal.
- Return — return to a section.
- End — closing signal.
Every command appears as a large, color-coded overlay on all the team's devices — impossible to miss.
Page-turn sync
Team members can enable following the leader — when the leader advances to a new song, their screen navigates to that song too. Scrolling within a song is individually controlled and is not synced.
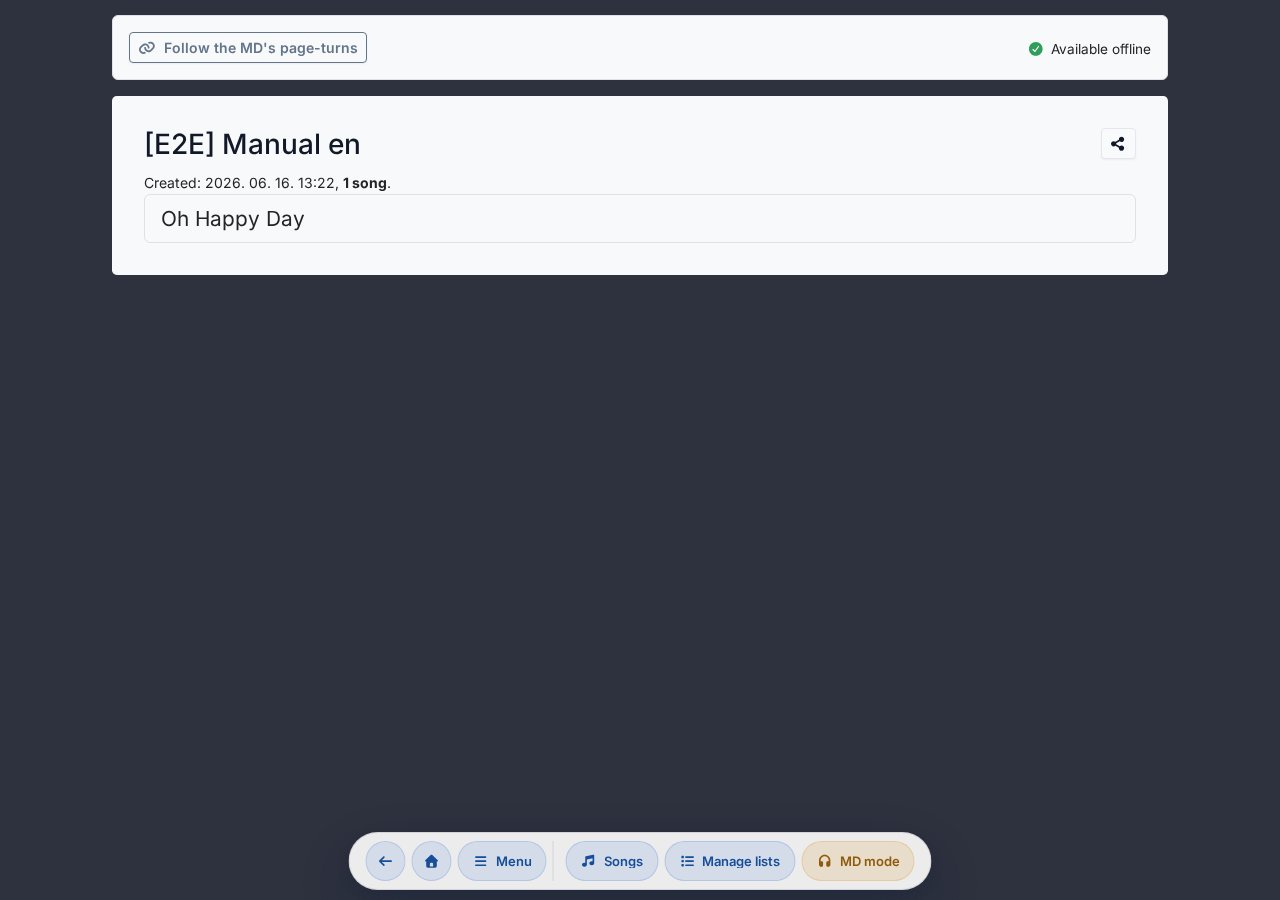
Follow pill (team member side)
When someone starts Music Director mode in your group, a "Following MD's page turns" pill appears at the top of the other members' setlists. It can be toggled with one click:
- On: the MD's song changes and commands automatically apply to your screen too — when the leader switches songs, you move to the new song as well.
- Off: you only see the MD command overlays (Stop / Continue / etc.) and a dismissible suggestion bubble on song change; you control your own navigation.
Break
If the leader moves to a --- break --- row in the setlist, followers also navigate to the break page — a "Break" song page appears with a coffee cup icon.
Editing and following setlists
The setlist is the group's shared program list for a given session. All members see the same thing in real time.
Creating a new setlist
- Go to the setlist sub-page, or open the management modal with the Manage lists button in the header.
- Enter the setlist name (e.g. "Sunday 05.10.").
- Enable MD mode (in the header Menu modal, Song and rehearsal section) — this also activates the old edit mode functions.
- Use the green + Add button on the song card in the song library to add songs to the list.
Ordering and breaks
- ↑ / ↓ — swap with the adjacent item.
- Add break — inserts a
--- break ---row (separates set blocks). - Remove from list — from the song page.
All setlists modal
Cloning a list
In the "Manage lists" modal, on the new list creation panel, a radio button lets you choose the "Clone current list" mode: this copies the contents of the currently open setlist (order, breaks, songs) into a new list with a name you choose. Typical use: clone last week's list as "Rehearsal 05.17." and just swap the 2–3 changing songs — no need to rebuild everything from scratch.
Sharing a link
The share icon in the setlist header copies the full URL to the clipboard — you can send it via chat, SMS or email.
Linking to an event
A setlist can be assigned to an existing event (rehearsal, performance) — this way the home screen Events box and the "Today's event" card also show which list belongs to which day. Multiple setlists can be linked to one event (e.g. a practice version and a live version).
- New setlist directly to an event: in the Events box, every event has a dashed red-outlined Setlist pill. Clicking opens a modal where the setlist name is pre-filled with the event date — just click Create new setlist and you're in the song library in edit mode with a basket.
- Linking an existing setlist: in the setlist sub-page header (only in edit mode + for group administrators) a Linked event dropdown appears. Here you can select the appropriate upcoming event, or override an existing link. For setlists linked to a past (ended) event the select is disabled — past data cannot be modified.
- When an event is deleted: the setlist remains, just loses its event link (no data is lost).
The link is visible even for read-only users (non-admin): a faint "Linked event: …" line in the setlist header shows which day the list is for.
If you try to save a new or cloned list without selecting an event but the group has an upcoming event, the app briefly prompts you and offers to link it — so the list is accessible from the Events box and "Today's event" card with one click. You decide freely: Select event returns you to the dropdown, Save without event saves the list without one. If there are no available (today or future) events, there's no prompt.
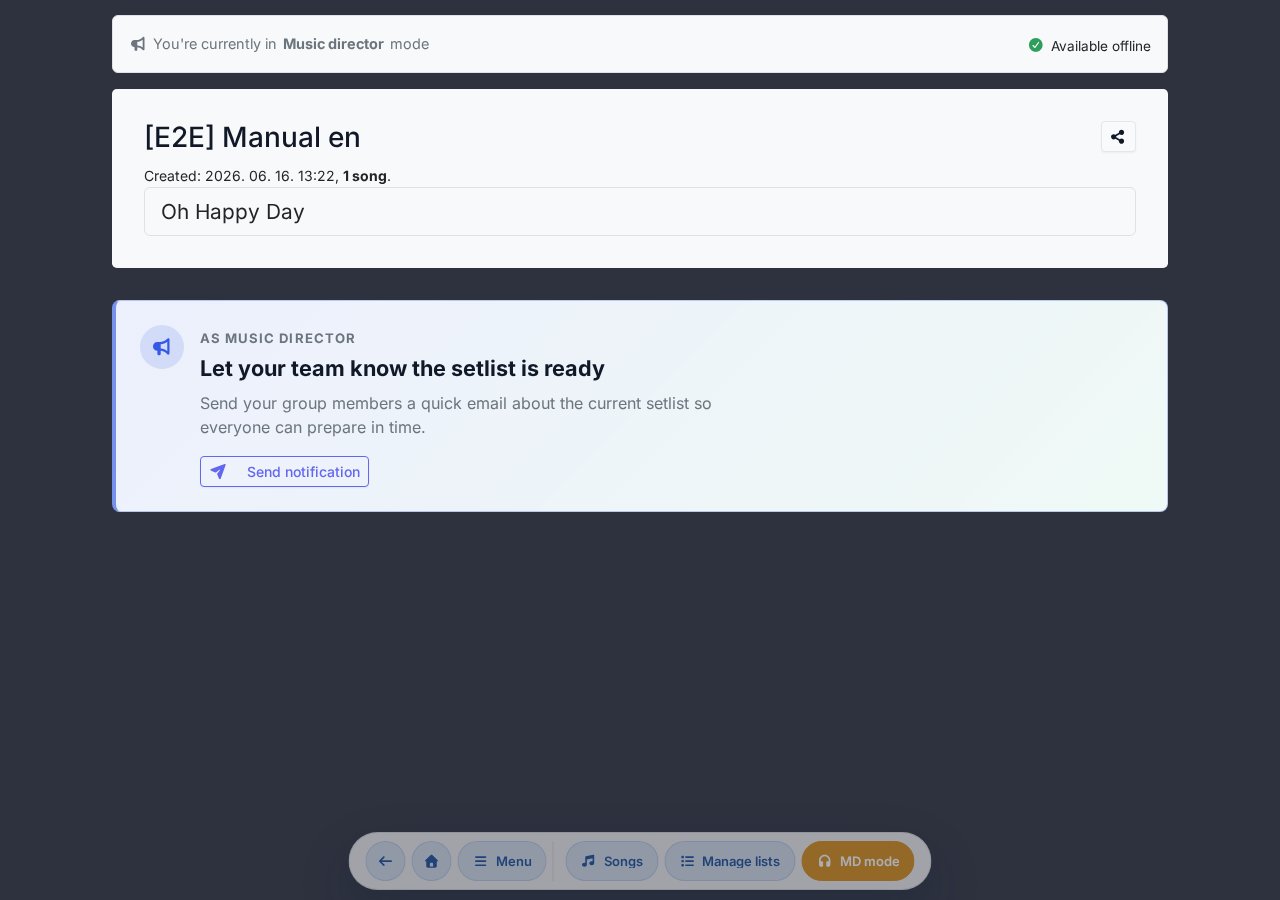
Notify the team: setlist is ready
When you've assembled the base list, you can notify the group by email with one button that the setlist is ready — so everyone has time to prepare. A highlighted card appears below the setlist ( Send notification), which briefly explains the feature.
- The card is only visible in MD mode and for group administrators, and only when the setlist was recently modified (within 3 hours of the last edit) and is not empty. If you touch the list again, the window restarts.
- Clicking opens a short confirmation dialog (multiple members will receive email, hence the confirmation request).
- The email contains the setlist's current order: the songs are clickable links, breaks are included, and a button goes straight to the full setlist. Fine print notes that the list may still change — you're just signaling the base setlist is ready.
- The sender does not receive the email themselves; you can see your own list anyway. A potential resend cannot be initiated within half an hour of the previous send (the button is disabled until then and shows the time of the last send).
- Whoever has enabled browser push notifications (Setlist ready category) also receives a discreet push notification on their phone/device in addition to the email.
Searching and browsing songs
The group's complete song library is accessible under the Songs menu item — searchable, favoritable, color-coded with a heatmap.
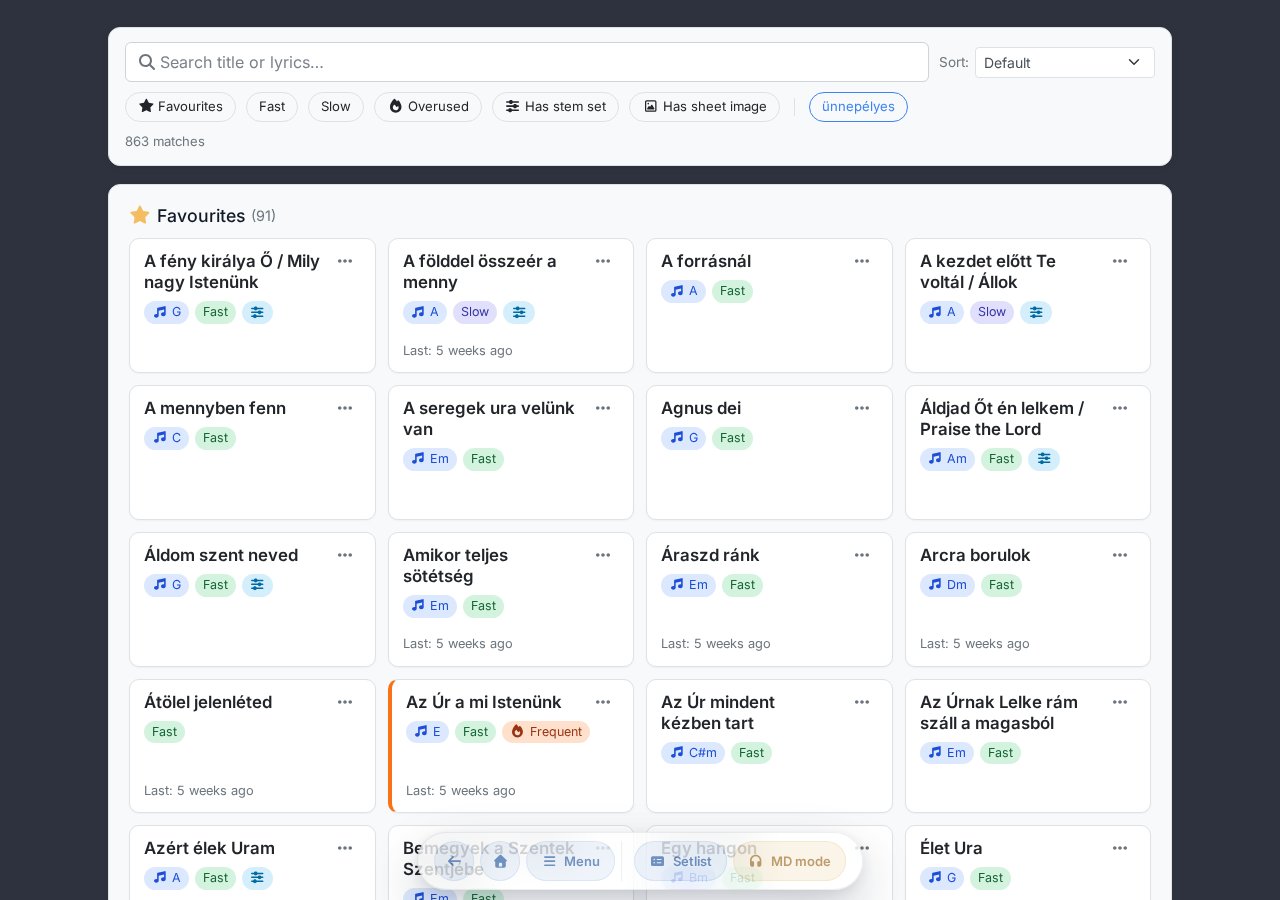
Search
Type a song title, a word fragment, or even part of the lyrics into the field at the top. The search filters across title + lyrics + tags simultaneously, is accent-insensitive, and ranks results by relevance:
- Title-start match > title contains > tag match > found in lyrics.
- Content search only starts for 3+ character queries to keep results clean.
- If the match was not in the title, a small "found in lyrics" or "found in tag" badge appears on the card.
- During search, sorting automatically switches to Relevance; returns to the original when the field is cleared.
Filter chips
Use the chip bar below the search to set combinable filters (multiple chips = AND):
- Favorites — only starred songs.
- Fast / Slow — based on the song's tempo label.
- Overplayed — songs played more than the group average in the past 90 days (shown with an Overplayed badge on the card).
- In list — in master mode + with an active setlist, filters to songs in the setlist only.
- Theme tags — group-level labels (e.g. festive, advent, ballad, etc.), combinable.
- Has stem set — only songs with a stem/multitrack package.
- Has sheet image — only songs with an uploaded sheet image.
Sorting
The sorting dropdown on the filter bar:
- Default — by title, favorites first.
- By title — alphabetical order.
- Least used — ascending by 90-day usage (good for finding new songs).
- Most used — descending by 90-day usage.
- Most recently used — by date of last setlist appearance.
- By played key — the saved savedkey alphabetically.
- Relevance — automatic during search.
Favorites vs. all
By default only the Favorites grid is shown (starred songs). Below it, a collapsible Full collection section shows all the group's songs in the same card format.
Overuse indicator ("Overplayed")
If a song appeared at least twice above the group average in the past 90 days (and at least 4 times total), the card shows an orange bar on the left edge + "Overplayed" badge. A useful aid to avoid repeating the same songs too often. (This is not the same as the old red heatmap — it's a separate, high-contrast indicator.)
Random fast / slow song
The Random fast song and Random slow song functions are accessible from the Song and rehearsal section of the global header Menu modal. The app suggests one from the group's repertoire using weighted randomness — favoring favorites and long-forgotten songs, avoiding recently played ones. It navigates directly to the chosen song.
Theme tags
Group administrators can create group-level labels (theme tags) — e.g. festive, advent, Christmas, Easter, ballad. Tags are created with an automatic color palette, and:
- appear as chips on the library's filter bar (multiple tags can be AND-ed);
- are visible on the song card below the title, so you can see at a glance what a song is for;
- can be selected per song on the editor page — a song can have multiple tags at once.
Setlist basket panel (master mode)
If you're in master / edit mode with an active setlist, a sticky panel appears on the right side of the library with the current list's contents. On desktop the panel follows the scroll; on mobile the "Setlist (N)" button at the bottom opens it as a bottom sheet:
- The + button on a card adds the song to the basket (the rest of the card still navigates to the song page).
- The panel's × button removes it.
- Songs can also be reordered in the panel — same as on the setlist page.
Tempo labels
Every song has a set tempo (slow, normal, fast) shown as a label. The Random fast song and Random slow song buttons in the Song and rehearsal section of the global header Menu modal use this.
Admin: adding songs and export
In the admin section of the library page (group administrators only), a single Add new song button opens a wizard where you choose what to create a song from:
- ChordPro text — opens a blank editor (classic manual entry).
- ChordPro files — upload multiple
.chofiles at once (drag-and-drop or file picker). - Sheet photo (book) — photograph or browse the pages of a booklet; rotate, crop and adjust contrast per page. Providing ChordPro is not required — the title is enough, and the song page defaults to showing the uploaded sheet image.
- PDF chart — each page of a PDF becomes a sheet image, as one new song (max. 30 pages).
- Import from Ez az a nap! — from the kotta.ezazanap.hu public library (see the next section).
- Image/OCR import (beta) — sheet image or photo converted to ChordPro via text recognition.
If you later write ChordPro text in the editor for a photo/PDF-based song, a Sheet image ↔ Text toggle appears on the song page so you can switch between the two.
The download icon in the header of the Full collection section exports all the group's ChordPro songs as a ZIP (for backup, archiving or moving to another group).
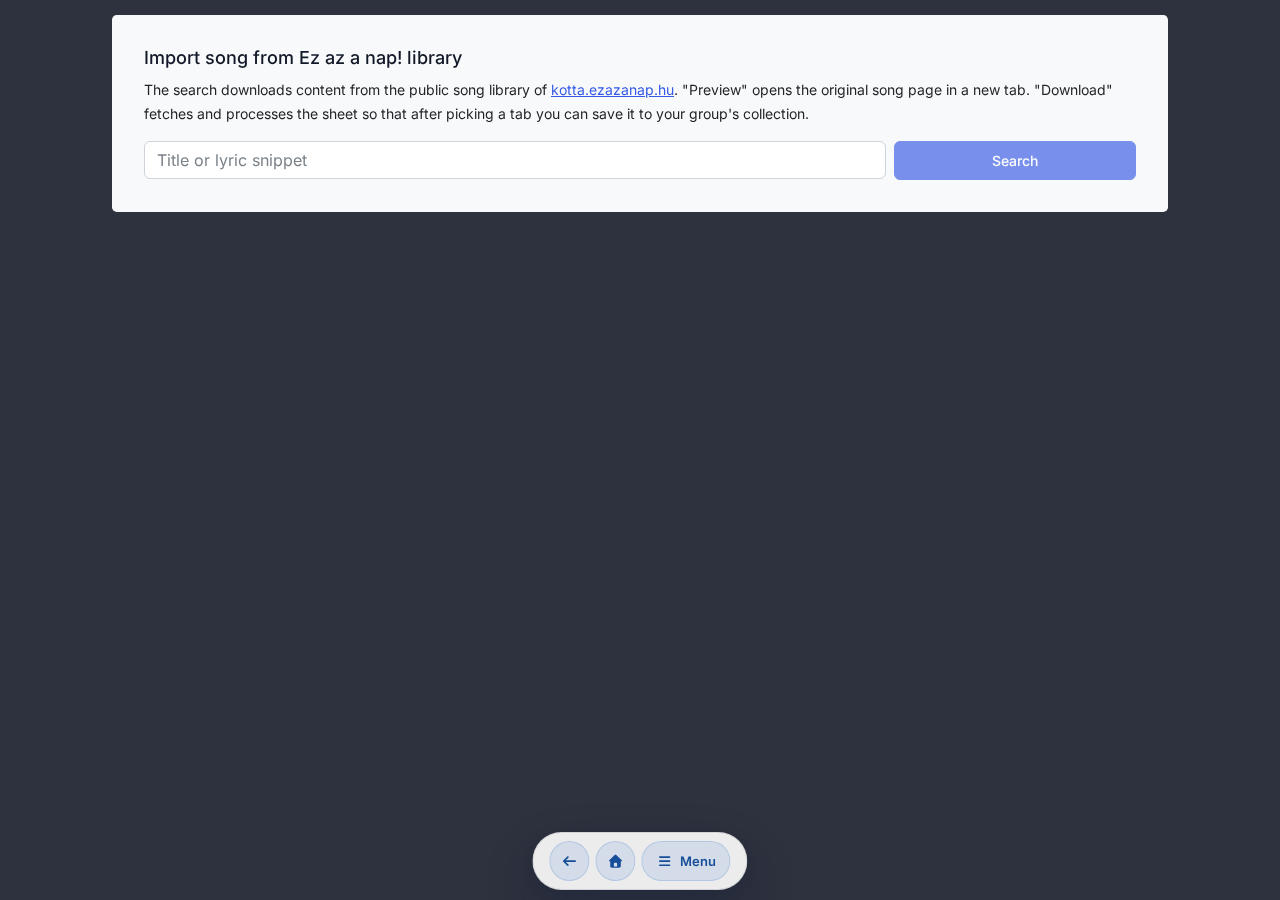
Importing songs from the kotta.ezazanap.hu public library
With the Import from Ez az a nap! button accessible from the Songs page, you can search the ~500-song public library at kotta.ezazanap.hu, convert individual songs to ChordPro and save them to your group's collection with one click.
The source site uses many different song formats (inline chords, chord row above lyrics, lyrics only, sometimes collapsed into a single paragraph). The parser handles 80–90% of these well, but sometimes you'll need to refine the generated ChordPro in the editor afterwards. Hungarian chord conventions (H → B, Esz → Eb, lowercase e → Em etc.) are automatically converted to standard notation during import.
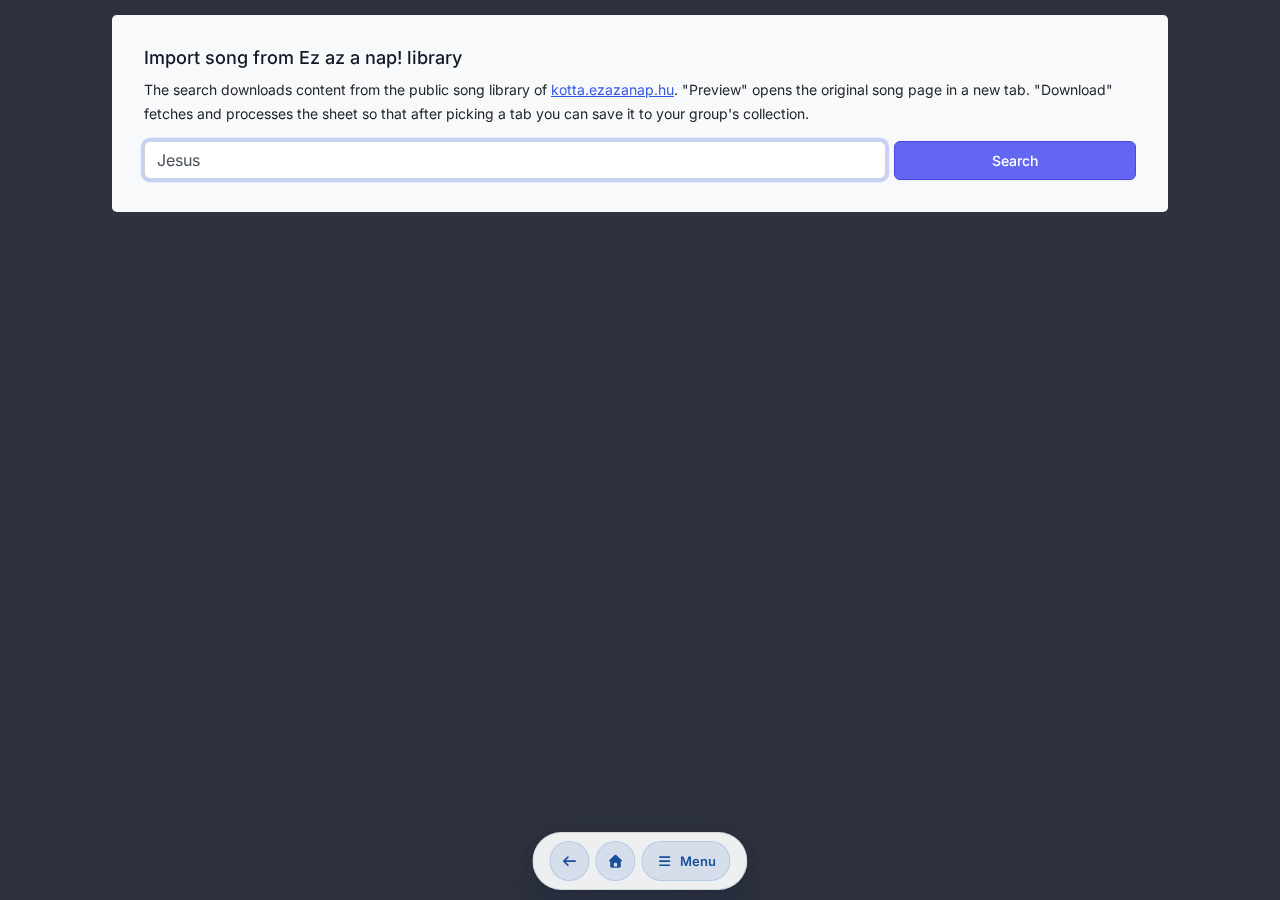
Search
The results list uses the source site's own WordPress search via proxy — chords365.com does not store this content; it's only saved when you click Save and open after the tab selection.
Tab selector panel
Each tab card gives a small preview of the generated ChordPro and shows:
- Format:
chordpro-inline,chords-over-words,lyrics-onlyorcollapsed. - Confidence: the parser's percentage estimate of how well-formed the ChordPro is.
- Warnings: number of unknown chord notations and normalization issues.
The Cancel button takes you back to the results list without saving anything.
Save and proceed
The Save and open button inserts the selected tab's ChordPro as a new song into the group's collection. The source URL and any PDF attachment links are saved in the ChordPro header ({meta: source ...}, {meta: attachment ...}). After saving, you're taken to the viewer (/song/:id) page — from there you can refine it with the usual editor button.
Duplicate handling
If a song with the same title already exists in your group, the new import comes in with a suffix (e.g. "Title (2)"). Import never overwrites your existing song, so you can delete trial attempts afterwards.
Copyright responsibility
The kotta.ezazanap.hu public library may contain copyrighted works. The import page shows a warning above the Save button. You decide whether you are permitted to use the imported content within your own group — chords365.com only provides the technical means for the transfer.
If the generated chord positions don't line up correctly (e.g. a chord-line was too long on the source page, so chords got "stuck" to the end), you can manually reposition them in the editor after saving — the import cannot always convert the source page's CSS-margin positioning to character positions.
Image / OCR import (beta)
The other import button on the Songs page, Image/OCR import, helps when you have a paper chart or a photo of a chord sheet someone gave you. The process is simple: take or browse to an image or PDF (max 30 MB) with the Select photo / image / PDF button — for multi-page PDFs you can navigate to the desired page. The app uses text recognition to extract the lyrics and chords.
- Open the Image/OCR import (beta) sub-page from the library.
- Take a photo or browse to an image / PDF.
- Frame the chart text directly on the image (leave out the header, page numbers), then refine with the rotation buttons and the contrast slider — a cleaner image gives dramatically better recognition.
- Start processing; the app handles the image with an OCR engine trained on both Hungarian and English.
- You receive the generated ChordPro draft in an editable textarea. You can fix it here before saving.
- After saving you're taken to the viewer page (
/song/:id).
OCR provides a starting draft. It has difficulty with handwritten notes, and makes more errors on colorful or skewed scans. Hungarian chord conventions (H → B, e → Em etc.) are automatically converted to standard notation, but sometimes further refinement is needed. The uploaded original image is not stored — it is only retained during processing, then discarded.
Restoring an entire library (admin only)
A previously exported full-library ZIP (see Group management → export) can be restored at the bottom of the Add song page, in the Start import section — visible to group admins only.
- First upload the large ZIP to the media library (using the media library's own chunked uploader — this way even multi-GB files go up).
- In the Start import section pick the uploaded ZIP from the list and start the import.
- The process runs in the background; at the end you see the report: how many songs were created, how many skipped, and how many failed.
The import skips songs that already exist (same title). Sheet music, sheet images and stem sets are recreated in the target group; audio waveforms are regenerated in the background.
Classic ChordPro and WYSIWYG editor
There are two ways to edit a song in the app: as text (in ChordPro) or with the WYSIWYG bubble panel.
Classic ChordPro editor
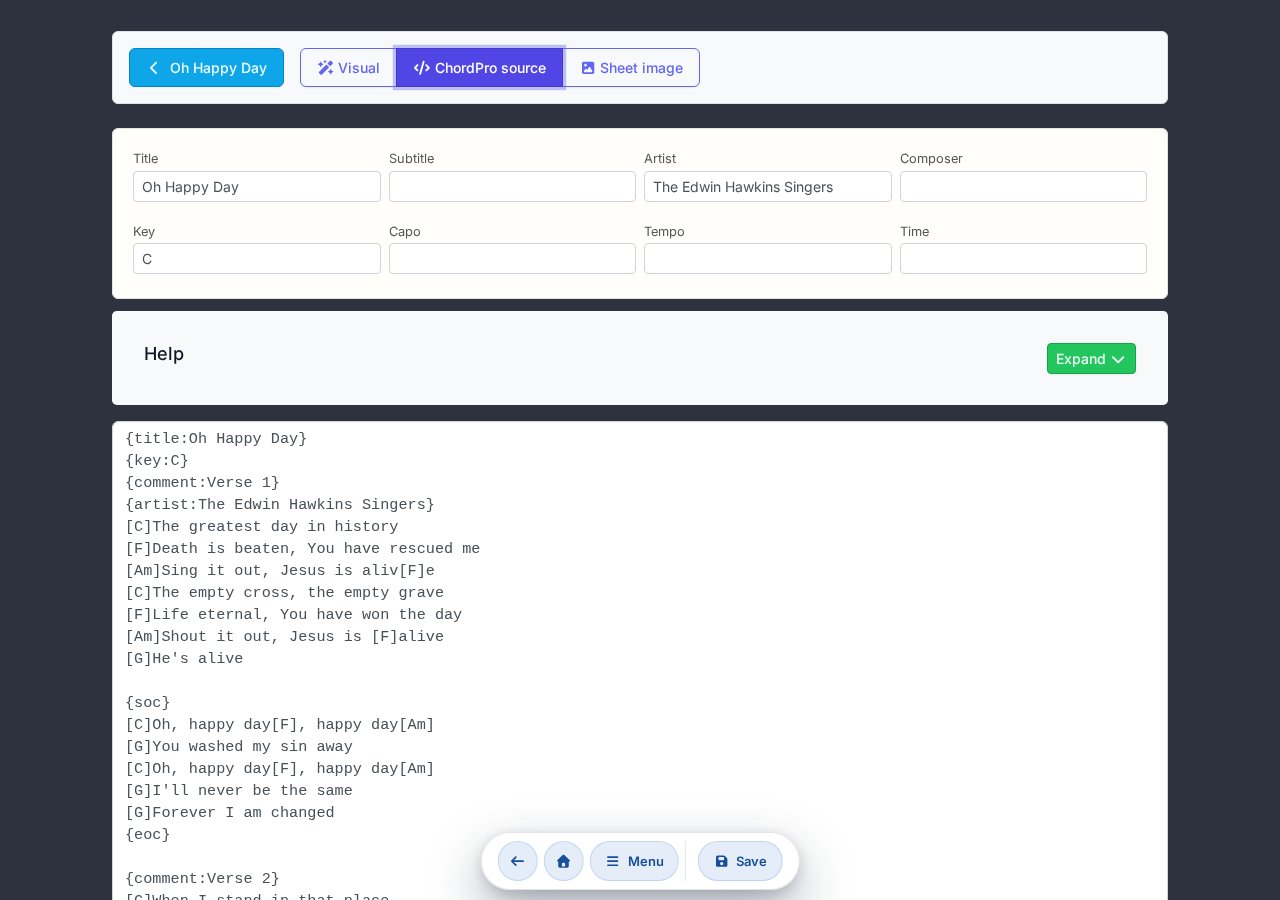
The full song is editable in a single textarea. Some useful directives:
{title:...},{subtitle:...},{key:...}{capo:4}— capo value{tempo:140},{time:6/4}{start_of_verse:Verse 1}...{end_of_verse}{soc}...{eoc}— chorus (Start/End of Chorus)[Am],[D/F#]etc. — chords inline in the text
Alongside the text field:
- Song tempo select.
- Upload sheet image — multiple images at once.
- Save — returns to the /song/:id page.
WYSIWYG editor (beta)
The other mode: you work on the rendered song-text view and insert chords by clicking.

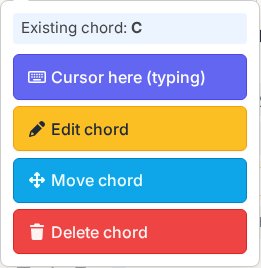
Insert / modify a chord: click an existing chord → bubble panel.
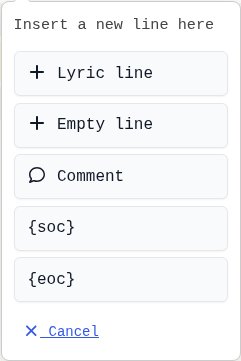
Insert a new row: clicking the row next to the + button lets you choose lyric row, empty row, comment, {soc} / {eoc} insertion.
For entering a new song from text import, use the classic editor. WYSIWYG is great when you're quickly adjusting chord positions on a well-structured song — especially in a touch-screen environment on a tablet.
Assigning theme tags to a song
The tag selector panel at the top of the editor (below the tempo selector) lets you assign one or more group-level theme tags to the song (e.g. festive, advent, ballad, etc.). Existing tags can be toggled on/off, and you can create a new tag on the spot (with an automatic color palette). These tags appear as filter chips in the song library and on the cards.
Sessions and attendance
The admin adds an event on a given day (rehearsal, concert, performance), and members respond with I'll be there, Uncertain or I won't be there — so everyone can see in advance who to expect at the session.
Adding a new event (group administrator)
- Click the New event button on the mini calendar (or click on an empty day).
- Enter the date and optionally a note (e.g. "MD: leader / vocalist, T: technician").
- Save — the event appears for everyone immediately.
- From this point members can indicate whether they can attend the session.
Setlists for the event
The first action bar of each event row shows a green Setlist pill, plus pills for already linked setlists. Clicking + Setlist opens a modal where a setlist linked to the event can be created with a single field (pre-filled with the date). After creating it you're automatically taken to the song library in edit mode with a basket — from there you can pick songs. Details: Setlist — Linking to an event.
Note line breaks
Notes can be multi-line; new lines are preserved. Tip: use "MD:" (music director / MD / setlist responsible), "T:" (technical responsible or theme), and list participants by initial.
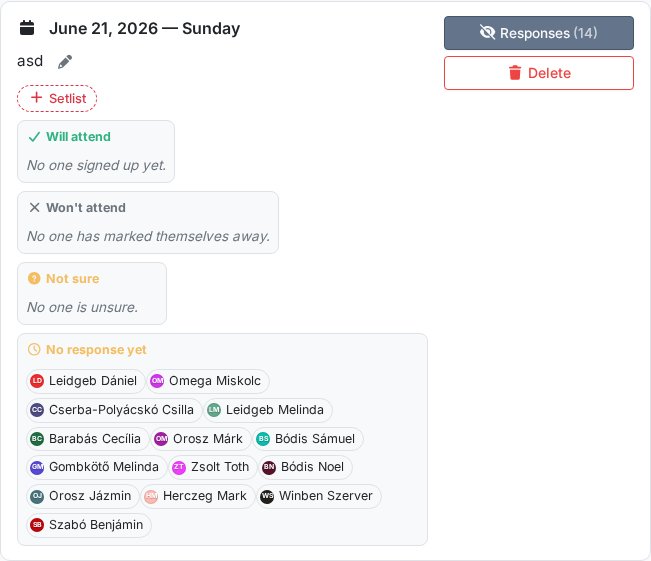
Responding: will you attend?
Every upcoming event row has three buttons: the green I'll be there, yellow Uncertain (not sure yet) and gray I won't be there. Your choice can be changed at any time. For past events (in the All events modal), instead of buttons a static indicator shows your previous response: I was there / I was uncertain / I wasn't there / No response.
Response collection is individually toggleable per member: if the group administrator doesn't request it from you (see chapter 13), the buttons simply don't appear on the event row.
Viewing responses
The Responses (N) button — visible to all members, not just admins — expands to show who responded how. Names are organized into four groups with small monogram avatars:
- Attending — those who chose I'll be there.
- Not attending — those who chose I won't be there.
- Uncertain — those who aren't sure yet.
- No response yet — those who haven't responded.
If any group is empty, a short message shows (e.g. "Everyone has responded." or "Nobody marked themselves as uncertain.").
All events modal
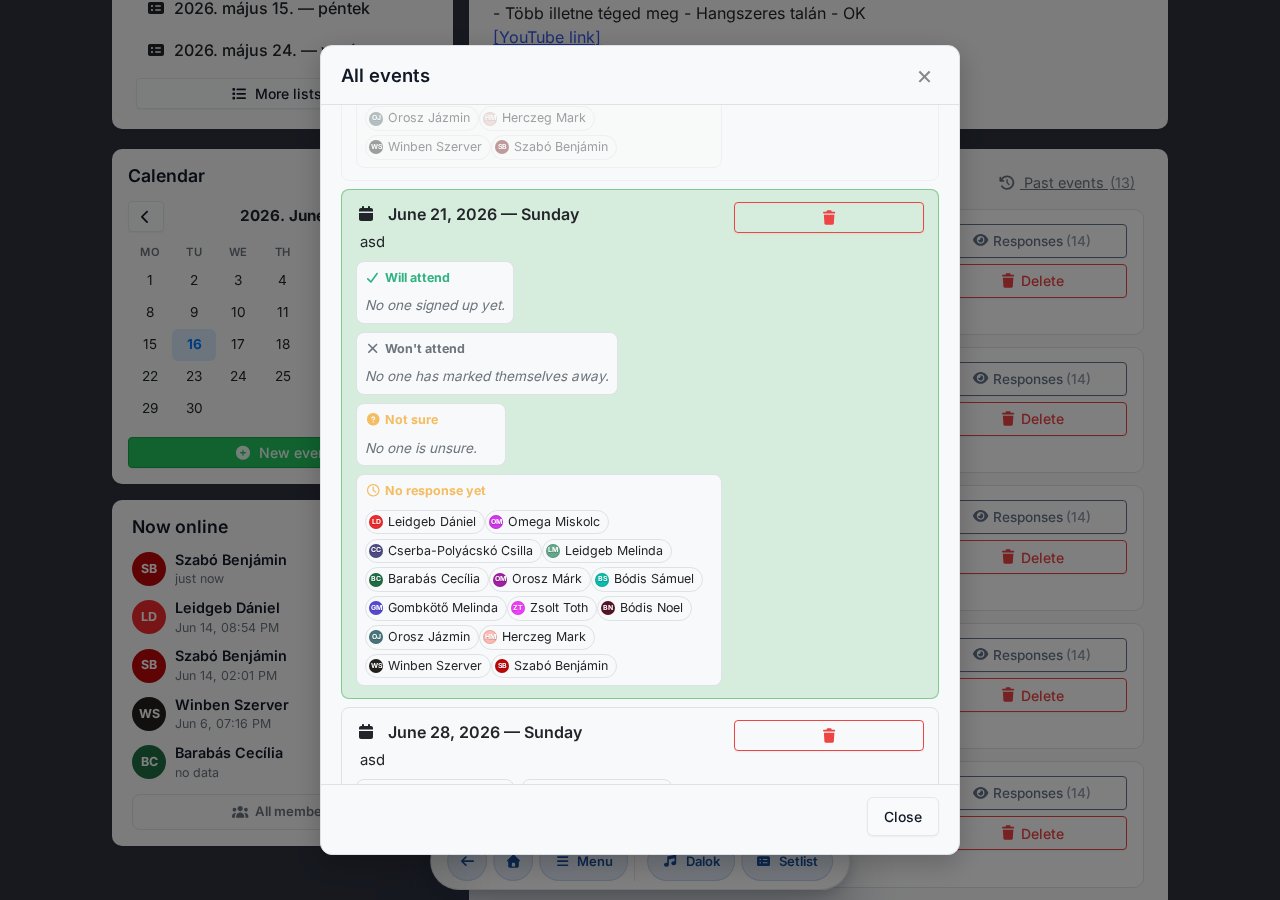
The modal can be opened in two ways:
- Past events (N) link next to the "Events" heading — scrolled to the past.
- More events (N) link below the list — scrolled to the first hidden future event.
- Mini calendar click on an event day — scrolled to that day.
Schedule notification email
If the group administrator enabled the Schedule notification option (see chapter 13), every Monday afternoon you'll receive an email about events in the next 30 days where you've indicated attendance. The email shows the dates, event notes and linked setlist links. The email footers include an unsubscribe link — you can opt out of one group's notifications individually without leaving the group.
Group administrator interface
The Manage group modal is accessible to all members at the bottom of the "My groups" widget (here you can, for example, initiate leaving the group). Group administrators also get an extra Open admin management link within this modal, which leads to the admin sub-page (/group-admin) described here.
Renaming the group
On the admin sub-page (/group-admin), a pencil icon next to the name of your currently active group opens a rename dialog. Enter the new name and save — the header updates immediately, and the new name appears for other members on their next load. (An empty name cannot be saved; overly long names are silently truncated.)
Schedule notifications
When enabled, the system sends every Monday afternoon an email to members with their schedule for the next 30 days, based on the calendar content.
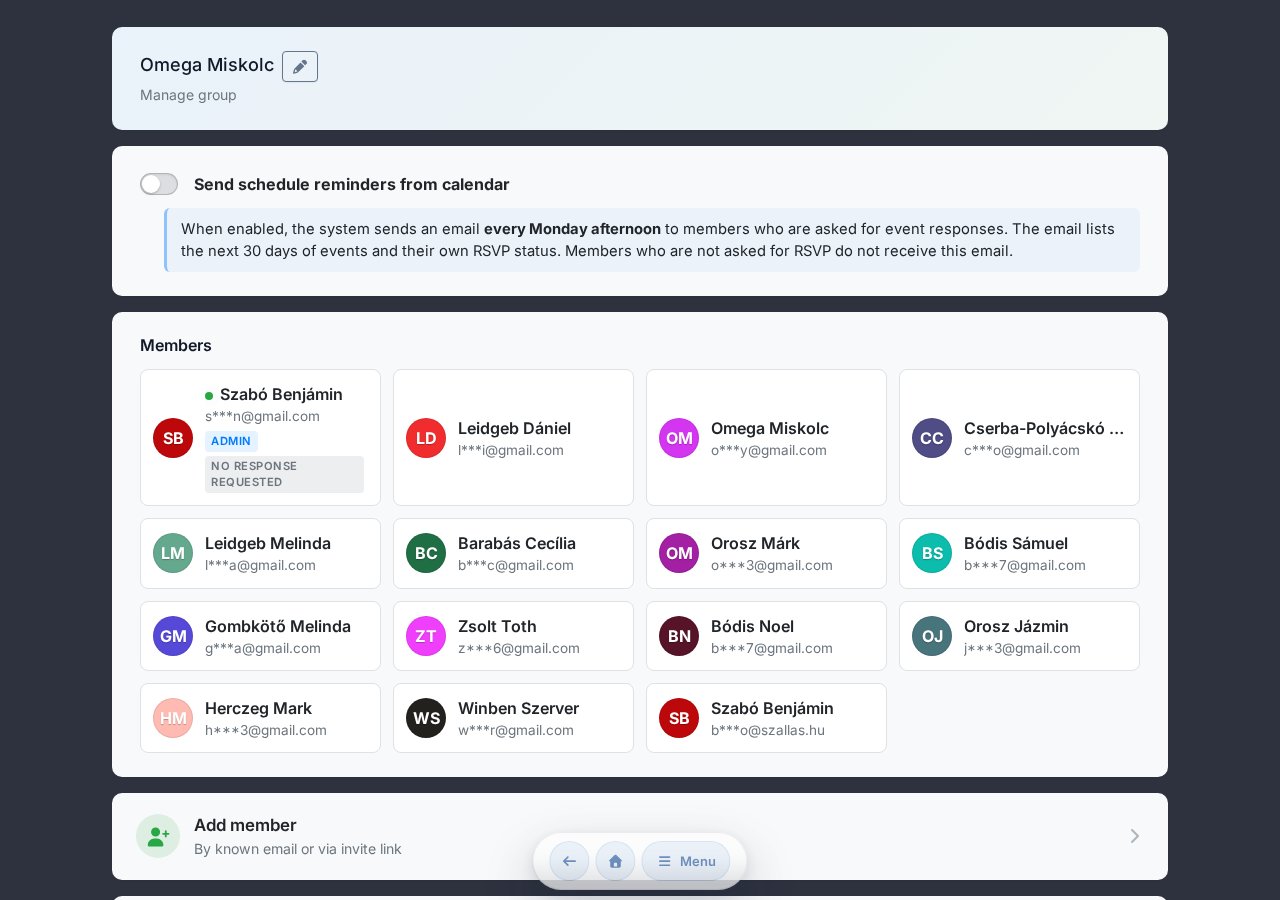
Member card view
Each member appears on a small card: monogram avatar (group-consistent color), name, anonymized email (s***[email protected] format). Currently active members have a green dot next to their name if their last activity (opening Chords365) was within the last 5 minutes — so before rehearsal starts you can see who's already online. Click a card → member modal with details:
- Admin status toggle — grant/revoke admin rights.
- Remove from group — with a confirm modal.
- Last sign-in time — you can see when they last used Chords365 (e.g. for identifying inactive members).
- Responds to events toggle — controls whether you request RSVP from this member for events (see chapter 12). When disabled, the member cannot respond and doesn't count as "no response yet"; their card shows "No response requested".
You cannot demote yourself from admin level, nor remove yourself from the group.
Adding a member
Clicking the Add member entry below the member list opens a dialog where you can add a member in two ways:
- By known email — if the person to invite already has a Chords365 account, enter their email address, look them up, and add them to the group with one click.
- Invitation link — generate a shareable invitation link, copy it and send it. Those who apply with the link still need to be approved separately (details in chapter 14).
Trash: deleting songs and setlists
Group administrators can delete songs (from the song menu in the library) and setlists (in the setlist header, in Music Director mode with the Delete setlist button). Deleted items don't disappear immediately — they go to the Trash (Menu → Trash, or the /kuka page).
- Restore — the song goes back to the library, the setlist back to the lists.
- Permanently delete — immediate, irreversible deletion of one item.
- Empty trash — permanently deletes all items in the trash at once.
Items placed in the Trash are automatically and permanently deleted after 30 days. The page shows per row how many days are left — you can restore them any time until then.
Exporting the entire library
On the group admin page, the Export entire library card packs the whole song library into a single ZIP. Using the checkboxes you choose what to include — sheet images/PDF, stem original, stem mp3, stem source files, tags; lyrics + chords are always included. The finished file is placed in the group's media library, and you receive a link by email. The estimated size is shown under the button (with lossless stems the ZIP can be several GB).
The ZIP can also be restored — see Import.
Inviting a new member with two-step approval
The group administrator generates a link-based invitation. The applicant still needs to be approved separately after applying, so nobody can join uninvited.
Generating an invitation link (admin)
- On the admin sub-page, click the Add member entry, then choose the Invitation link option.
- Click the Generate link button, then copy the displayed link with the Copy button.
- Send the link to the person being invited (via chat, email, SMS).
- The link is valid for 14 days, and any number of users can apply with it. You can also see the active links with a countdown, and revoke any of them.
Join request (invitee)
- The invitee clicks the received link.
- If not signed in, they are returned here after login.
- On the confirmation page they confirm their join intention with the Send request button.
- The admin is notified of the request by email.
Approval (admin)
- The View request button in the email takes you to the join requests section of the Manage group interface.
- You see the applicant's name, email, device and timestamp.
- Approve or Delete — both are finalized with a confirm modal.
- After approval, the member receives an email notification, and sees the group on their next sign-in.
Only the User-Agent is saved from the applicant's device, along with a timestamp — no IP address or geolocation is stored.
Managing active invitations
In the same place — the Add member → Invitation link dialog — below the generation form we list all still active invitations: the invitation token, when it was created, how much time is left until the 14-day expiry (e.g. "3 days 22 hours remaining") and how many join requests have come in for it. Any invitation you no longer want to use can be revoked with one button — the link becomes invalid immediately. Previous requests (even if the invitation was revoked) can still be approved.
Join requests list
The page's separate Join requests section shows the pending requests you haven't acted on yet. Per row:
- The applicant's name and email address.
- The device (User-Agent text, so you can see whether they applied from mobile/desktop).
- The request timestamp.
- Approve / Delete buttons — both finalized with a confirm modal.
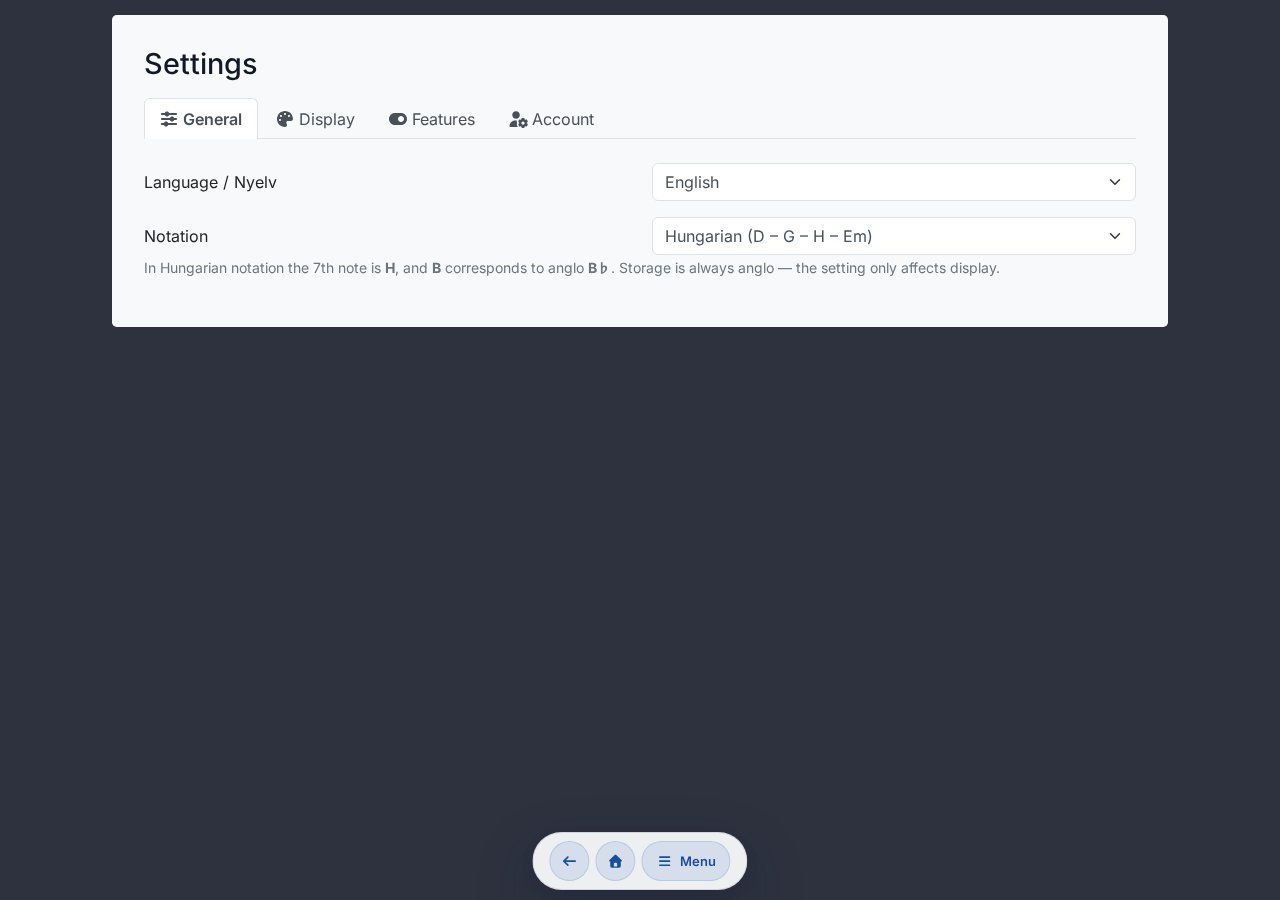
Detailed user settings
The Settings menu item in the global Menu modal leads here. Organized into multiple tabs, you can customize everything: General, Display, Features, Account.
General tab
- Language: Hungarian or English.
- Appearance: System / Light mode / Dark mode.
- Chord notation: Hungarian (D – G – H – Em) or Standard (D – G – B – Em).
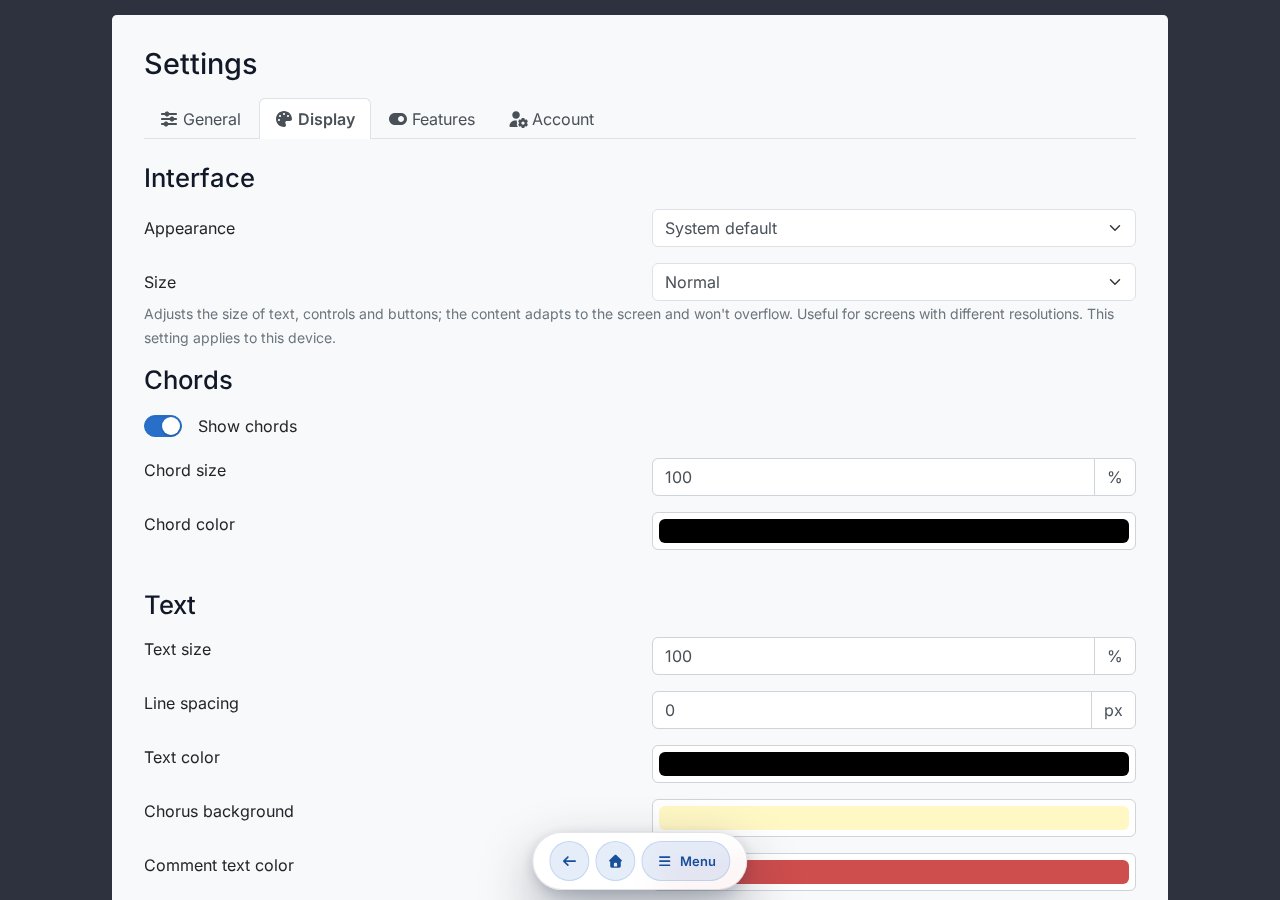
Chords section (Display tab)
- Show chords toggle (there are situations where only lyrics are needed — e.g. for vocalists, or for projection).
- Chord font size and color.
Text section (Display tab)
- Font size, line spacing (px).
- Color, chorus background, comment text color, background color.
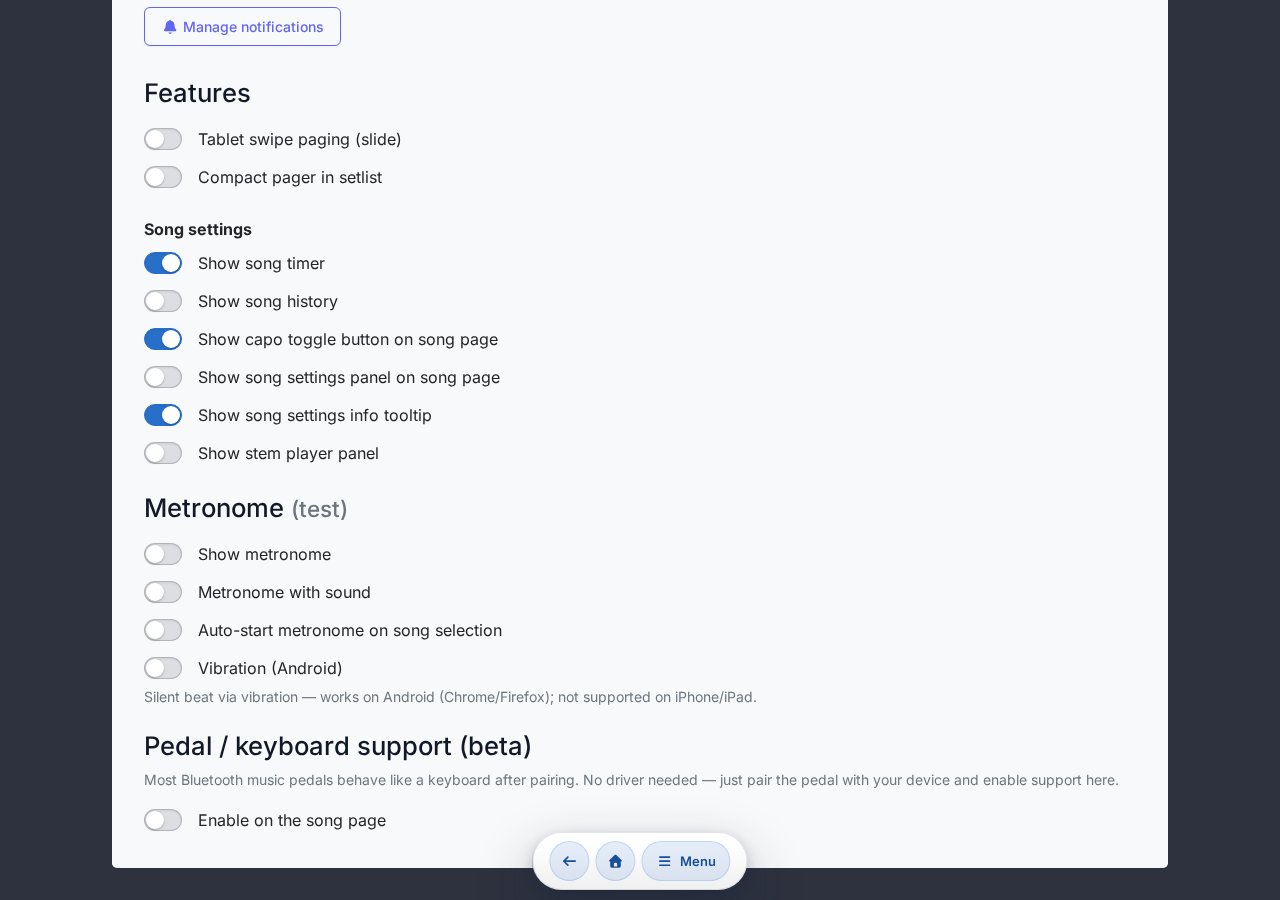
Features
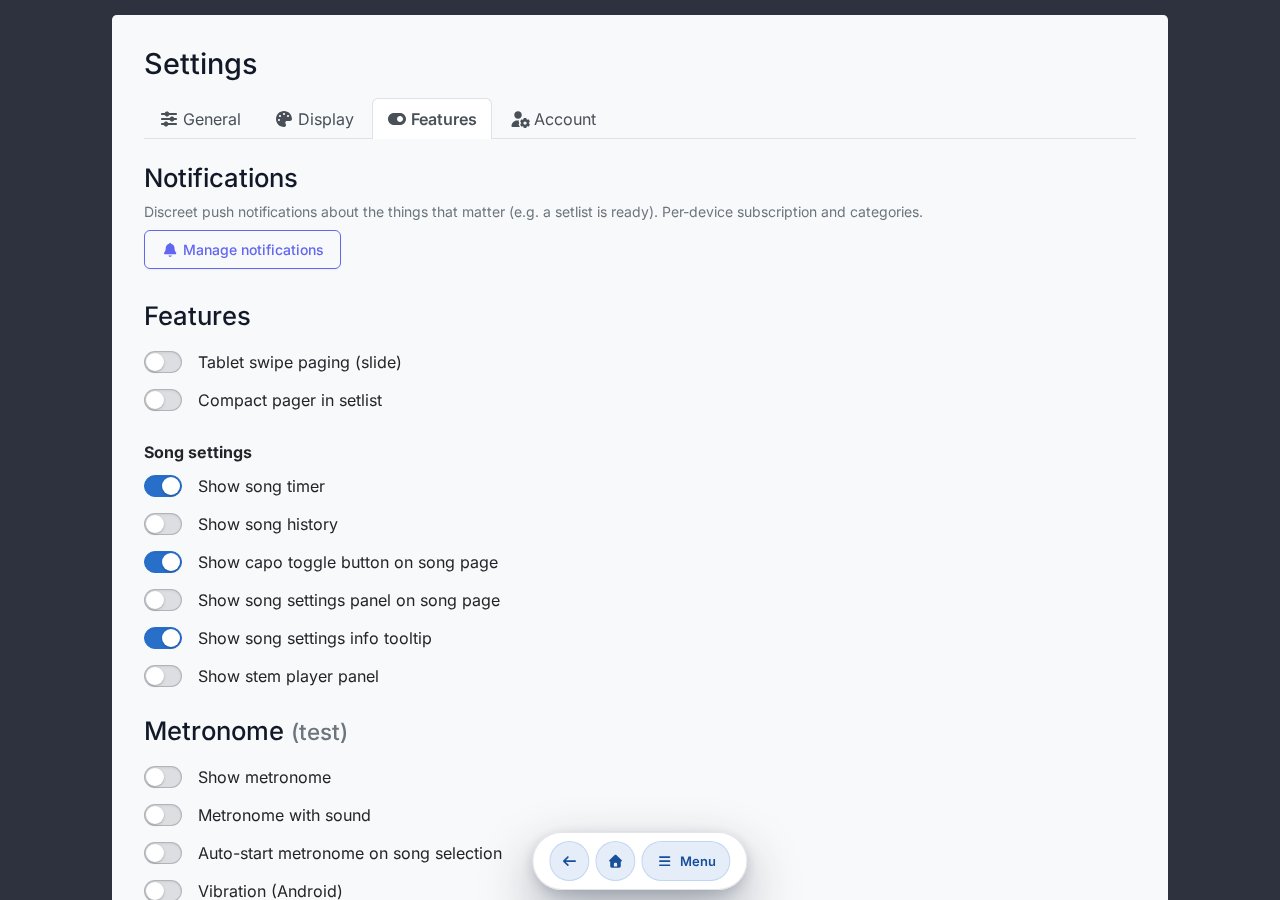
- Tablet slide page-turning feature.
- Compact page-turn in setlist.
- Show stem player bar.
The Features tab has a further sub-section Song settings (see below), with additional toggles — Song timer, formatting panel, History, Capo toggle, info tip.
The finger drawing toggle is not here — it's accessible with the hand icon button in the drawing layer toolbar on the song page (see chapter 6).
Song settings
- Song timer — measures performance length.
- Formatting options on song page.
- Show song history.
- Show capo toggle button.
Metronome (test)
- Show metronome.
- Metronome with sound.
- Metronome with vibration: the phone vibrates to the beat — followable on a loud stage or without headphones. The first (accented) beat vibrates longer. In settings you can choose "vibration only" (silent) mode and vibration strength. This works in Android browsers (Chrome/Firefox); iPhone/iPad doesn't support it, so the toggle doesn't appear there.
- Auto-start on song selection.
Pedal / keyboard support (beta)
See chapter 17.
Browser push notifications (separate page, opt-in)
Beyond schedule emails, Chords365 can also send browser/device-level push notifications for important events. You can enable them in two places:
- At the home screen prompt: if your browser supports push and you haven't decided yet, a prompt appears once on the home screen — the "Enable" button enables everything in one move. All notification categories turn on (we request the permission globally), but you can turn any of them off individually afterwards.
- From the Settings page: in the Notifications section, the "Set up notifications" button takes you to the
/notificationssub-page, where you can subscribe/unsubscribe per device and fine-tune per category.
Subscription is always per device: you enable it in that browser/device (the browser asks once); you need to enable it separately on another device.
What can you get notified about?
On the /notifications page you can individually toggle what you receive push for:
- Setlist ready — a team member has signaled that a list is complete.
- Setlist modified — a list's songs, order or key has changed.
- Session change — a session was cancelled or changed that you'd signed up for.
- New group news — the admin posted new news on the group board.
- Group membership — join requests, approvals and membership changes in your groups.
- Headcount for sessions (for admins) — we notify you when the required number is reached, or when only one member is missing.
- Stem processing done — track separation is complete and playable.
- Stem processing failed — a track processing job errored; retry with one tap.
- System announcements — important system-level announcements and maintenance notices.
- Test notification: you can test with one button whether push arrives on your device.
- iPhone / iPad: push only works if you've first installed the app on your home screen (Safari, iOS 16.4+). If your browser doesn't support push, the page shows this.
Notifications are data-frugal: they contain no sensitive details (email address, file name, source URL), and only arrive when you've requested them.
Unsent changes (DLQ)
If an offline-save operation hit a 4xx error on the server (e.g. conflict, permissions), it goes into the dead-letter queue. Here they are listed; you can manually retry or discard them.
Profile: display name
At the top of the Account tab, in the Profile section, you can change your own display name — this name is shown in your groups, the calendar and the member list. Enter the new name and press Save (only active if the name has changed and is not empty). The change takes effect for your other devices and group members' screens on the next load. The email address cannot be changed here.
Save and reset
The Reset settings button (to default values) is on the Account tab. There is no separate Save button — changes are saved automatically, and a brief "Saved" indicator flashes in the header.
Download my data
On the Account tab, in the My data block, you can download a copy of the data Chords365 stores about you as a ZIP file with one button. This is the self-service fulfillment of your GDPR access and data portability rights — no separate request needed.
- The package contains a human-readable summary (README) and machine-processable JSON/CSV files: profile, group memberships, calendar responses, song activity, capo and drawing settings, projector/stem metadata, email history, account operations.
- For security reasons it does not contain login secrets, session data, other users' email addresses, or raw media/audio files — the omitted fields are listed in the package's
manifest.json. - You'll receive a security notification email for every download; if you didn't request it, change your password and let us know.
Danger zone: account deletion
In the Danger zone section at the very bottom of the Settings page you can initiate deletion of your own account. The process is two-step to prevent accidental loss of access:
- Click the Delete account… button → confirm modal where you confirm your intention.
- A confirmation link is sent to the email address of your account. The link is valid for 1 hour.
- Clicking the link in the email, a further button finalizes the deletion.
- Your personal data (notes, drawings, favorites, capo settings) are deleted.
- Group-level content (songs, setlists, events) remains, only your name is anonymized in the author fields.
- If you are the only member of a group, the entire group and all its content is deleted along with you.
- If you are the only admin of an active, multi-member group, deletion cannot proceed — the modal tells you which group you need to first transfer admin rights to another member in.
Projecting lyrics and slides
Chords365 can project song lyrics to a separate projector — with background images/videos, a brand logo, or slides assembled per song. Projection can be started in several ways: to an external display on this device, wirelessly by casting, or by pairing another device via QR code.
Starting projection — three modes
In the Projection and control section of the global header Menu modal (only if you belong to a group), the Project to external display / Cast button opens the Start projection dialog with three options:
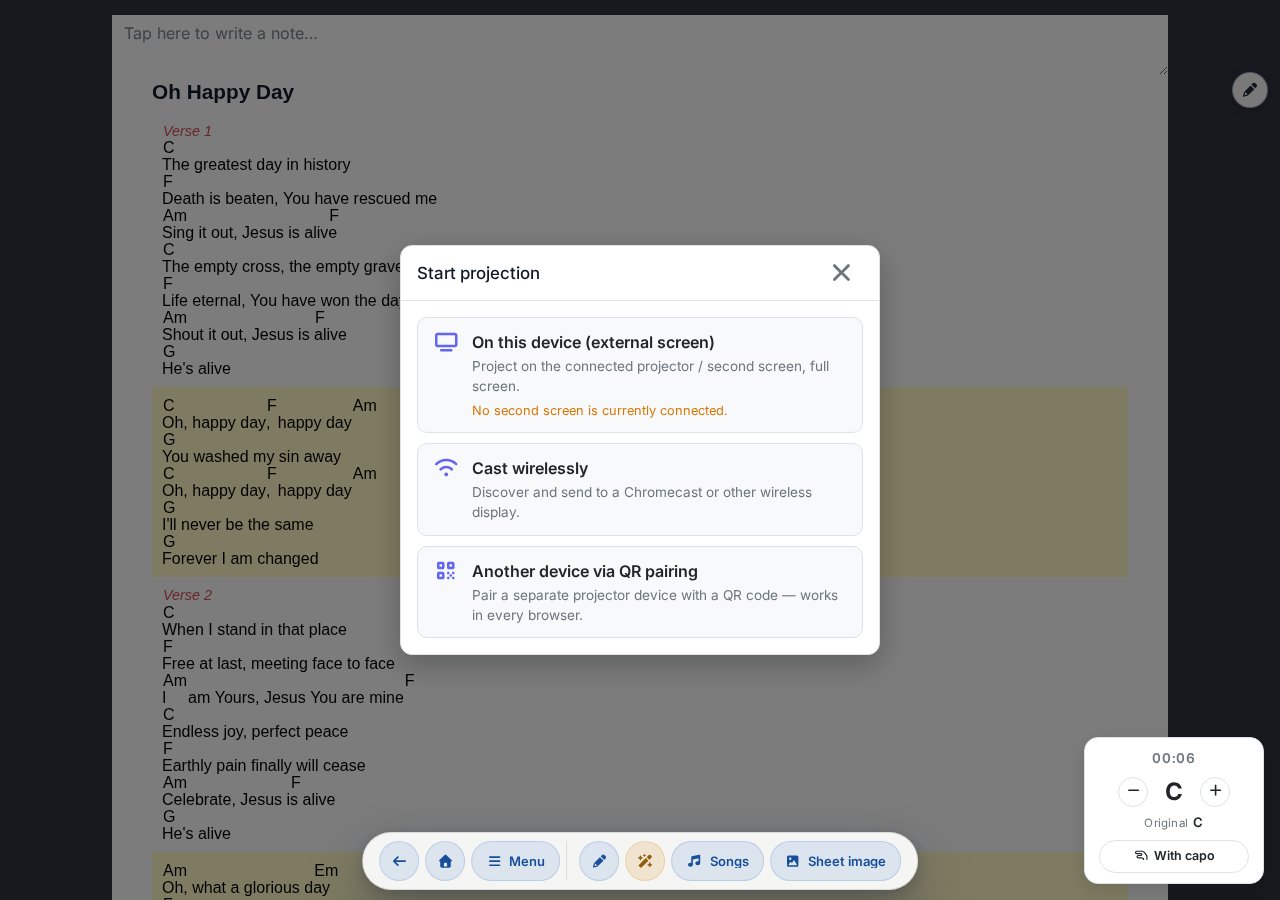
- On this device (external display) — the projection appears on the connected projector / second display in full screen. If no second display is connected, the dialog indicates this.
- Cast wirelessly — discover and send to a Chromecast or other wireless display.
- Another device with QR pairing — pair a separate projector device via QR code (see below). This works in every browser.
The first two modes use the browser's native display sending, so they're available under Chrome / Edge only; under Safari and Firefox only the QR pairing option appears. When projection is running, the Stop projection button here stops it.
Text and background settings
The Projection and control → Text and background settings menu item opens a global dialog where you set the projected text appearance and the background (accessible from anywhere, not just the song page):
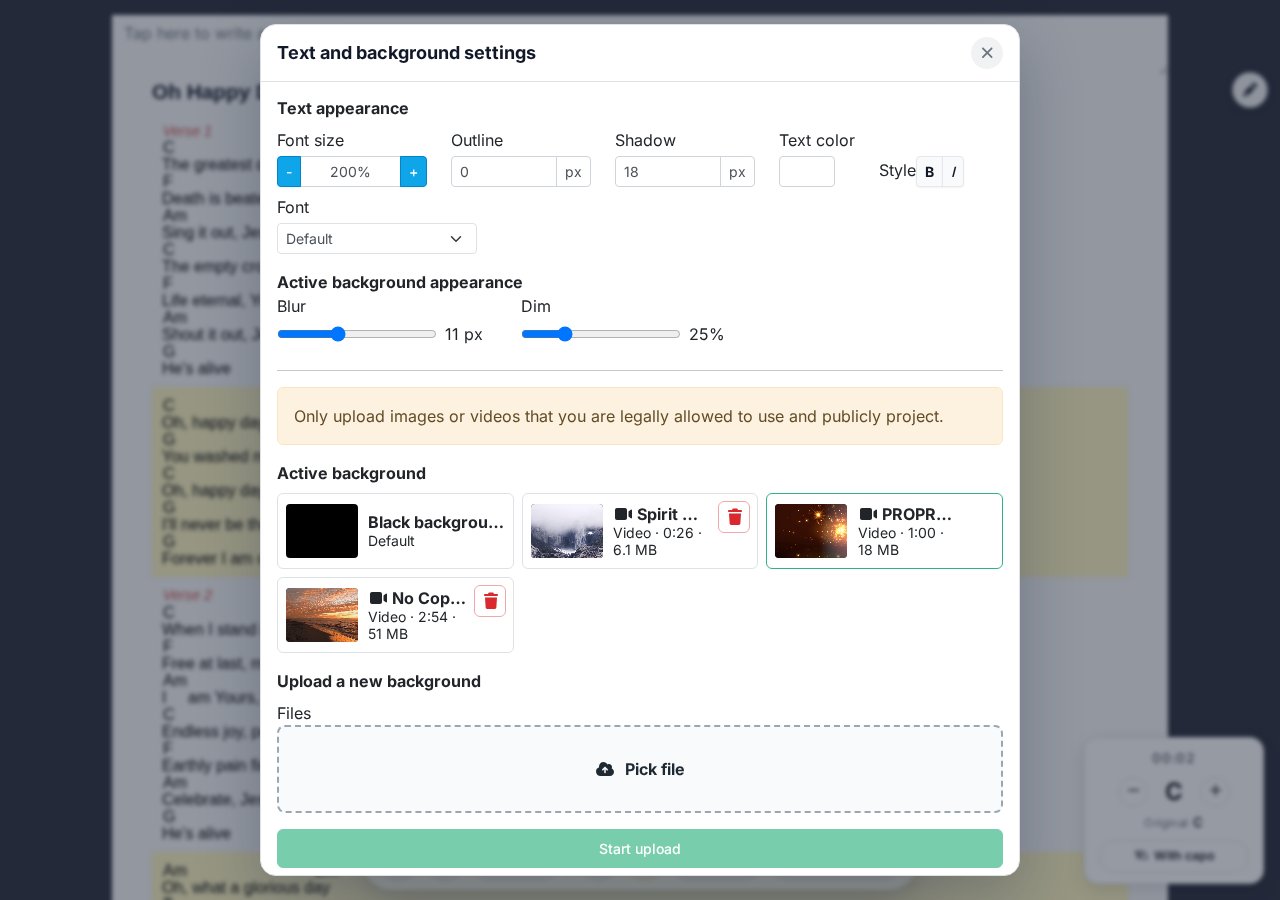
- Font size with %-step adjustment, 10% increments (default 200%, can be increased without limit).
- Outline, shadow (px), text color, style (B bold / I italic), font.
- Active background appearance: blur in pixels and darken as a percentage.
- Active background selector (Black, or any uploaded image/video).
- Upload new background — image or video (max. 5 minutes), or Browse the shared media library from the group's media library. Only use content you have the legal right to use!
Brand logo on the projector
In the Brand logo settings section of the same dialog, a logo (image or video) can be placed in one corner of the projector — e.g. the band's or community's emblem.
- Choose logo: No logo, a previously uploaded logo, or an image browsed from the shared media library. Upload new logo / Browse logo from shared media library.
- Appearance: the Position is one of four corners (Top left / Top right / Bottom left / Bottom right), Size and Margin are adjustable with sliders.
Slideshow — per-song slides
Instead of flowing text you can project slides broken down per song. On the song page, the Menu → Song quick-box → Slideshow toggle switches to slide view, where a slide grid appears in place of the lyrics.

- Generate from lyrics — if the song has ChordPro text, a single button turns it into slides (without chords and comments, approx. 2 lines/slide). Freely editable afterwards.
- Create blank slide / New slide — add a slide manually.
- Edit: the slide text can be changed; Split cuts at the cursor into two slides; arrows Forward/Back reorder; Delete.
- Project — clicking a card puts that slide on the projector (the projected slide is marked with a LIVE badge).
- Regenerate — rebuilds the slides from the song text (overwrites existing ones).
Projector pairing via QR code
If the projector is a standalone device (e.g. a tablet or laptop connected to the projector), you can pair it with your own device via QR code. From that point, setlist changes and song selections automatically appear on the projector.
- On the projector device, open the pair sub-page — a QR code and a pairing code appear.
- On your own device, choose the Start projection → Another device with QR pairing option. The camera starts automatically — point it at the QR code shown on the projector. If the camera supports it, the Zoom buttons (1×, 2×, 3×…) let you zoom in on the code. If there's no camera or you don't grant permission, you can also manually enter the 6-character code visible on the projector below the QR code.
- The two devices are paired — the paired projector is now under your control.
Hands-free page turning
During live playing your hands are often occupied (guitar, microphone or keys). A Bluetooth foot pedal solves this: once paired it behaves as a keyboard, and the app maps those keys to page-turning, scrolling and song switching — no plugin required, works in every browser (desktop and mobile).
Enabling
- Pair the pedal with your device from the system Bluetooth menu (e.g. iOS Settings → Bluetooth, or Windows settings).
- In Chords365 Settings → Pedal / keyboard support section, enable: Enabled on the song sub-page.
- Choose a profile (see below) or set up your own custom mapping.
Profiles
Choose from three ready-made profiles, or fully customize. The profiles assign actions to the most common pedal keys (arrows, PageUp / PageDown, Space):
| Profile | What it does |
|---|---|
| Song switching with arrows (default) | ← / →: previous / next song · PageUp / PageDown: previous / next section · Space: scroll down |
| Classic | ← / →: previous / next section · PageUp / PageDown: previous / next song · Space: scroll down |
| AirTurn | ← / →: previous / next section |
| BT Page Flip | PageUp / PageDown: previous / next section |
| Custom | each action can have its own key recorded |
What do the actions do?
- Song switch — jumps to the previous / next song in the setlist (same as the ◀ / ▶ buttons on the screen edges).
- Section jump — scrolls to the top of the next (or previous) verse / chorus; if the song has no sections (e.g. sheet image mode), scrolls half a screen.
- Scroll — a half-screen smooth scroll downward.
Recording a custom mapping
In a custom profile, record a separate key for each action: click the "Record key…" button, press the key sent by the pedal, and the app remembers it. Esc cancels.
Activity indicator
When pedal support is active, a small flashing dot in the top left corner indicates at every event that the pedal input was received successfully.
Works at rehearsal even without Wi-Fi
Chords365 can be installed as an app on your home screen, and opened content remains accessible when offline.
Installation
- Open chords365.com in Chrome / Safari / Edge.
- Desktop (Chrome / Edge): an "Install" icon appears in the address bar — click it.
- Mobile (Android Chrome): menu → "Add to Home Screen".
- iPhone / iPad (Safari): "Share" button → "Add to Home Screen".
Installed as an app it integrates with the OS too
Once installed, Chords365 integrates with your device's usual workflows:
- App icon shortcuts: long-pressing (or right-clicking) the app icon lets you jump quickly to today's event, the setlist, the library or projector pairing.
- Share to Chords365: from another app (e.g. file manager, photos) you can share image(s) or a PDF, and Chords365 — without OCR — creates a new song from it as an image-based song (each page as a separate sheet image, stacked). You can edit the title before creation.
- Open an audio file: on desktop Chrome / Edge you can open an audio file (MP3, WAV, FLAC, M4A) directly with Chords365 and upload it to a selected song for the stem feature.
These capabilities are platform-dependent (vary by browser and OS) and only appear when installed as an app.
What works offline?
- The full content of opened songs — text, chords, sheet images.
- The current setlist.
- Your own notes, transposing, drawing layer.
- Changes are stored locally and automatically sync when connection is restored — as an installed app even if you've closed Chords365 in the meantime (background sync, as soon as the network returns).
What doesn't work offline?
- Music Director mode (live sync) — requires being online.
- Searching for new songs, importing.
- Join requests, invitations.
Offline indicators
When the app goes offline, a persistent banner appears at the top. For certain action attempts (e.g. saving a new song) a popup modal also warns you.
Automatic offline sync — no download button
The old "Prepare offline" button is gone: you no longer need to manually download anything. While you're online, Chords365 automatically takes care in the background of making everything available offline. One sync cycle:
- keeps your 10 most recent setlists as protected packages (guarded from browser storage cleanup) on the device — songs, sheet images and the team's drawings together;
- continuously syncs the full song library (all song text + chords, sheet images in the background);
- when you open a setlist — even one outside the most recent 10 — it's automatically prepared for offline too.
Sync starts when the app launches and every time the network returns. That it's working is indicated by the spinning sync icon in the header (see 19. New menu → Sync indicator).
Setlist offline status indicator (read-only)
A small status indicator at the today's event and at the top of the setlist shows offline readiness — it's now informational only, no button (downloading/deletion is automatic):
- Available offline — the full list content has been downloaded.
- Preparing… — currently being prepared in the background.
- Partially available — something (e.g. a large sheet image) hasn't downloaded yet.
Offline storage (Settings → Account)
The Settings → Account tab's "Offline storage" section shows the status of offline data.
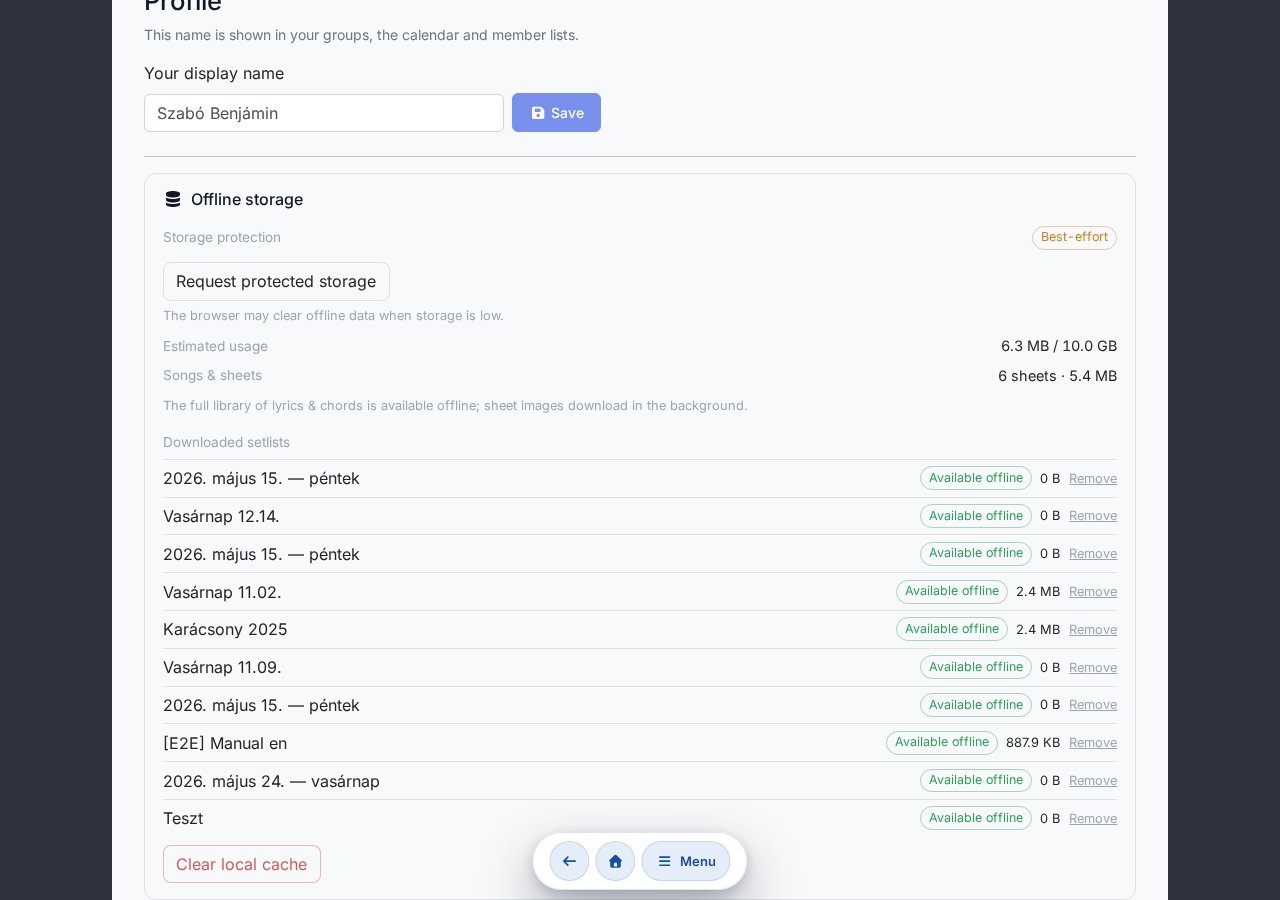
- Storage protection — Protected / Not guaranteed / Not supported. If the browser allows it, the Request protected storage button lets you request persistent protection, so the browser won't delete offline data when space is low.
- Estimated usage — how much space the offline-stored content takes up out of the total quota.
- Songs and charts — the full library sync status (how many charts, what size).
- Downloaded setlists — the list of protected packages, each with an Available offline / Partially available indicator, size and individual Delete.
- Clear local cache — empties the entire local offline store with one button.
The browser may delete offline data when space is low — the definitive source is always the server, so everything can be redownloaded on the next sync.
There's nothing extra to do: it's enough to open Chords365 once online before rehearsal (best before leaving for the venue, with Wi-Fi) — background sync automatically downloads fresh setlists, sheet images and drawings. Everything stays accessible even if Wi-Fi drops.
One button, every feature
The Menu button in the top bar opens a fully grouped feature panel — virtually every action in the app is just one click away. The menu is context-aware: on a song page, an extra quick-action box for that song appears at the top.
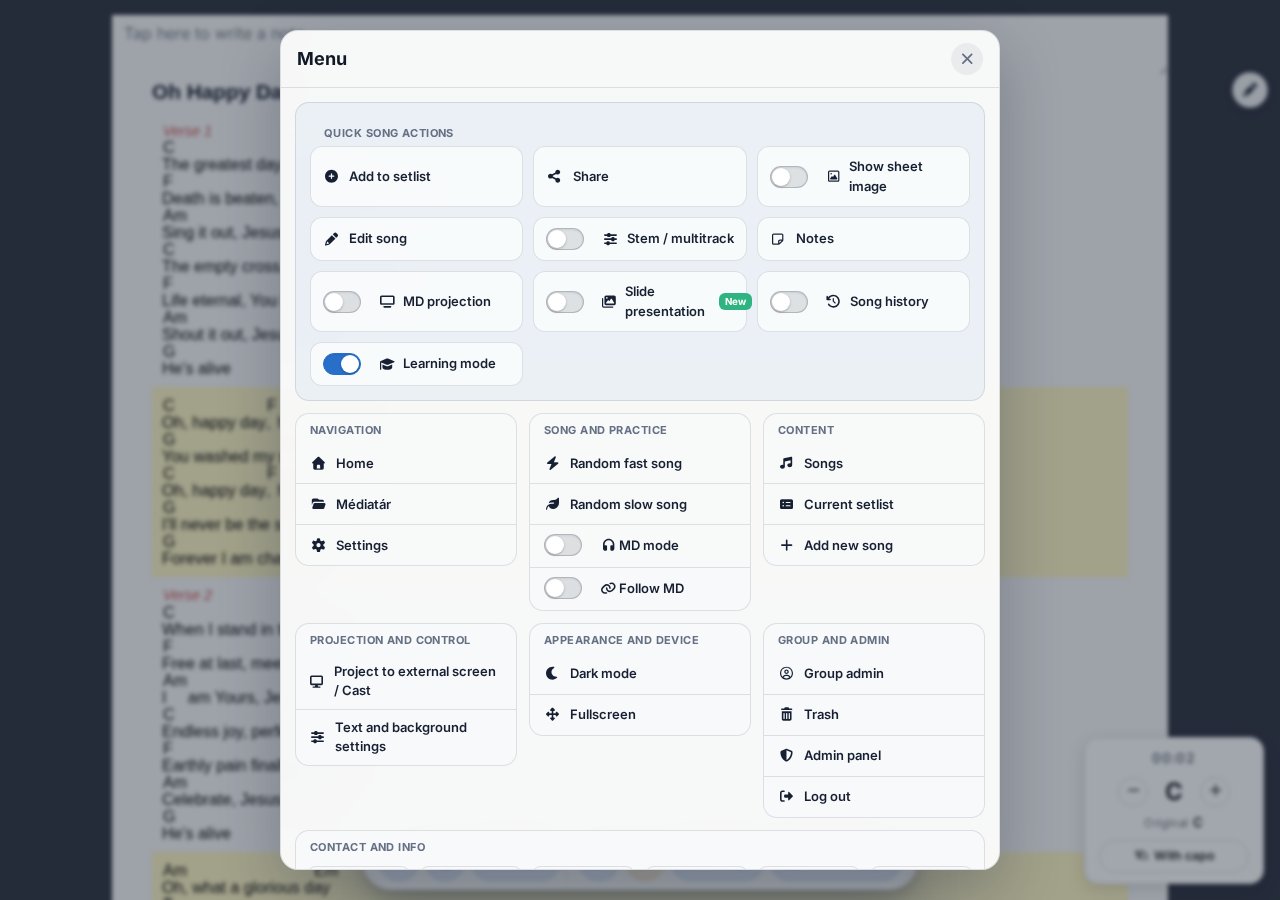
Sections
- Navigation — Home, Media Library, Settings.
- Song & Rehearsal — Random quick / slow song, MD mode and Follow MD toggle.
- Content — Songs, Current Setlist, Add New Song. (The "Ez az a nap!" sheet-music import starts from the Songs page — see Import.)
- Projection & Control — Project to external display / Cast (opens the Start Projection dialog: external display, Cast, or QR pairing), Text & background settings.
- Appearance & Device — Dark / light mode, Full screen (and current offline sync status).
- Group & Admin — Group admin, Trash, Sign out.
- Contact & Info — Email, Feedback, Bug Report, Manual, Support, Uptimerobot.
Song quick-action box (song page only)
When a song is open, an extra block appears at the top of the menu: Add to setlist / Remove from setlist, Share, Sheet music toggle, Edit song, Stem / multitrack toggle, Notes, Projection control mode, Slide presentation toggle, Song history toggle. All your most-used song actions in a single tap.
Outbox indicator
If there are unsynchronised changes in the background (offline edits / lost connection), a floating cloud icon and counter appear in the top-right corner. Opening the menu shows a text status in the Appearance section as well.
Sync indicator
When the automatic offline background sync is running (downloading fresh setlists and the song library), a spinning sync icon appears in the top-right corner with the label "Offline sync…" (during library sync, progress is shown too, e.g. X/Y). This is a purely informational indicator — no action is needed, and it disappears automatically once the cycle finishes. If the Outbox icon is also visible, the sync icon shifts slightly to the left so they don't overlap. Opening the menu shows a text status in the Appearance & Device section as well.
Hungarian and English interface
The entire interface is now available in both Hungarian and English. Your choice syncs across all your devices — if you switch your tablet to English, your phone will follow.
Language selection
Switch in Settings → General → Language: Magyar or English. The new language takes effect immediately — no page reload required. Notification emails (schedules, group invitations, bug report confirmations, broadcasts) follow the same setting.
Appearance (theme)
The theme selector sits just below the language option: System default (follows the OS), Light mode, or Dark mode. You can also toggle it with a single tap from the menu (Appearance & Device → Dark/Light mode).
Note naming (H or B)
Here you can also choose whether the 7th degree in chords appears as H or B. Storage always uses the Anglo-Saxon convention, so this setting only affects how chords are displayed.
Before you sign in
The HU / EN toggle in the top-right corner of the login screen lets you switch the entire flow to English before signing in — including the post-Google redirect screen and confirmation emails.
Email to all group members
Group administrators can now send an email broadcast to all group members directly from the app — for rehearsal info, song requests, event announcements, and more. Daily limit: 3 broadcasts per group to prevent spam.
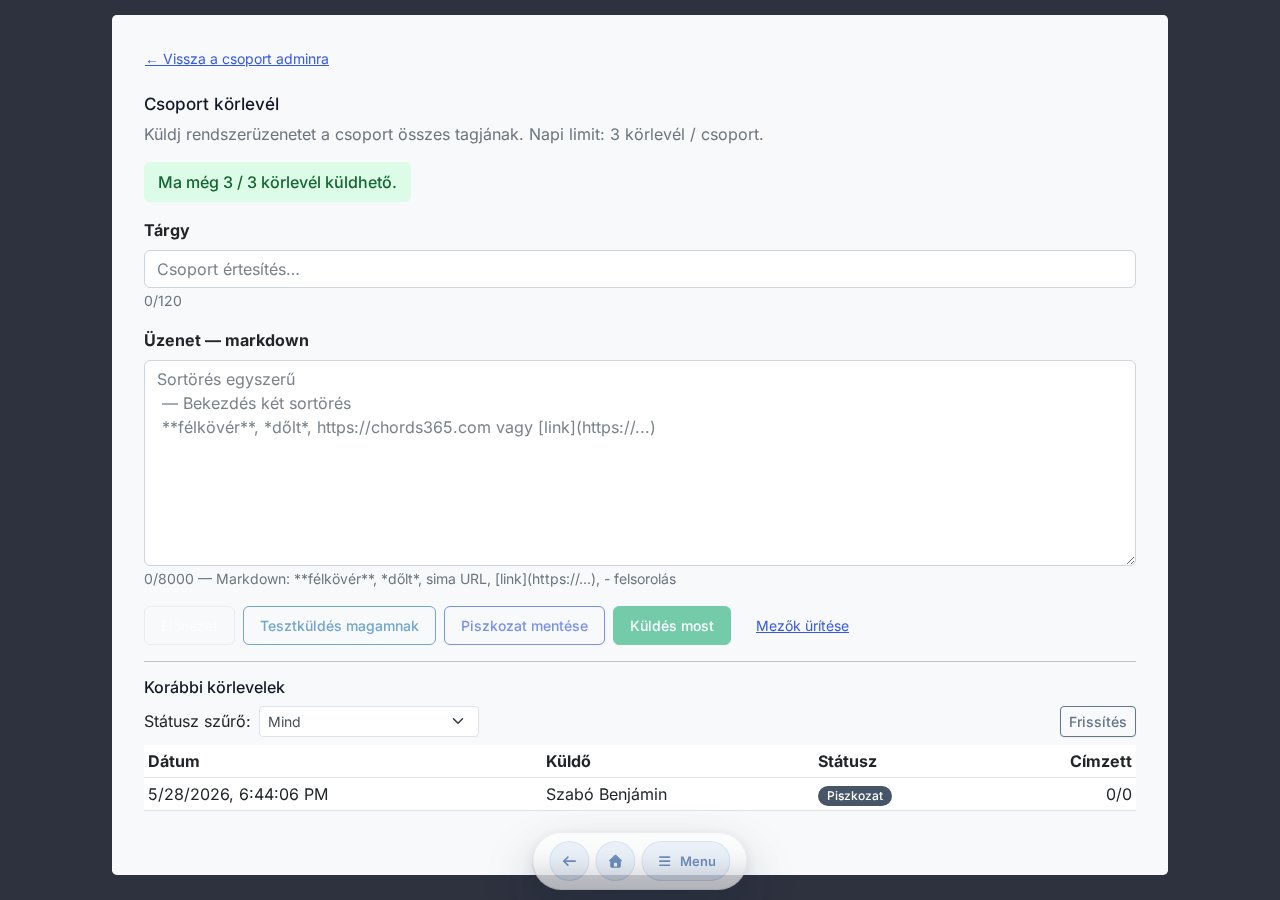
Where to find it
On the Manage Group page (see chapter 13), go to the Group Broadcast section and click Open Broadcasts → to reach the /group-admin/broadcasts sub-page.
Steps
- Enter a Subject (max. 120 characters).
- Write the Message in markdown —
**bold**,*italic*,[link](https://…),- list itemare supported. Max. 8,000 characters. - Preview: check the HTML render before sending.
- Send test to myself: confirm it lands in your inbox before the real send.
- Send now: after a confirmation modal the process starts asynchronously — track status in the "Previous broadcasts" table below (Draft / Sending / Sent).
Draft
If you leave without sending, click Save draft to come back to it later. The subject and message will be restored when you reopen it from the list.
Sending is rate-limited and burst-protected to preserve domain reputation. Once the daily group quota of 3 is reached, you can use it again tomorrow.
One-click bug reporting
If something looks off in the app, the Menu → Bug Report button instantly captures a screenshot of what you're seeing, lets you draw on it (arrows, circles, highlights), and sends it to the developers along with your short description and profile details.
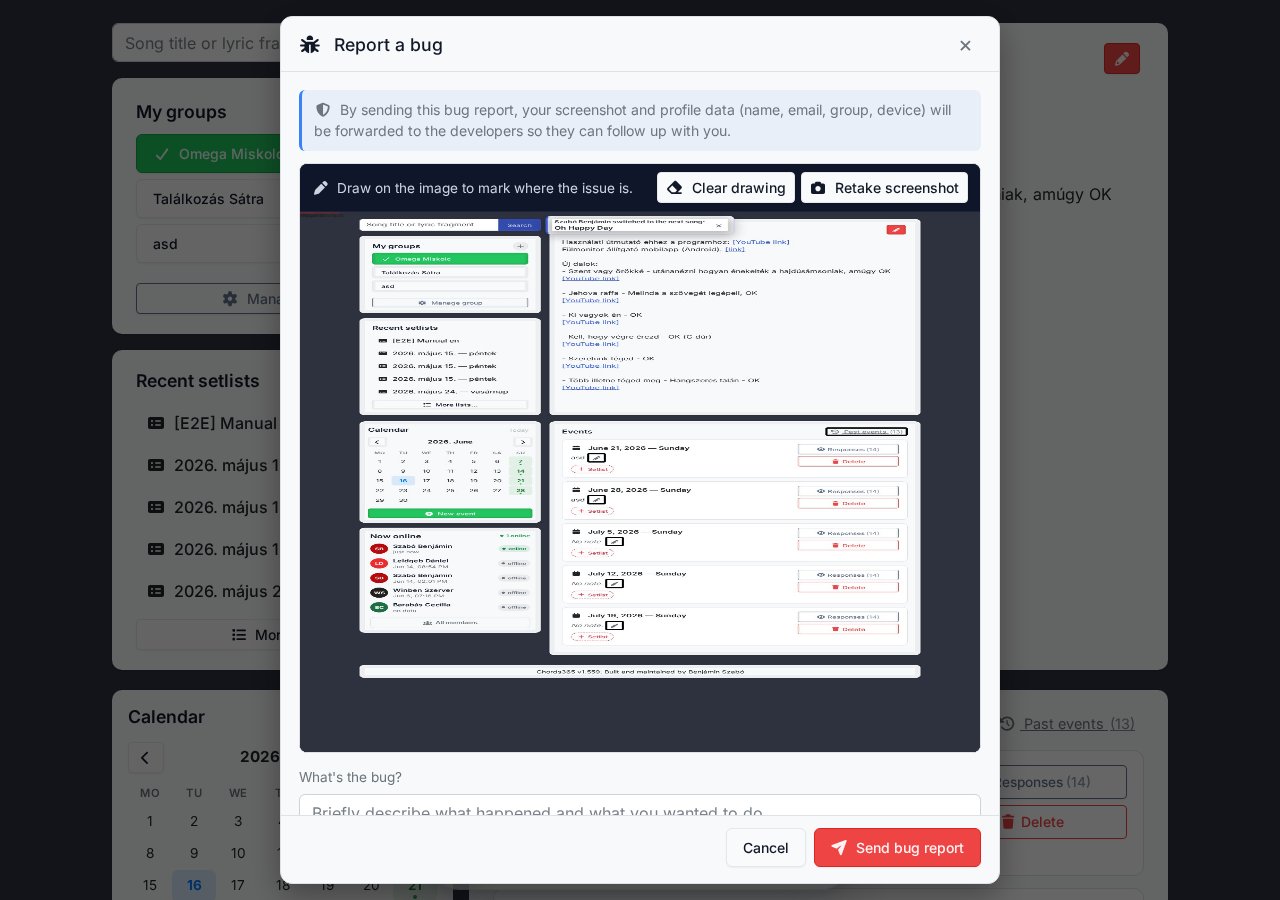
Steps
- Open the menu and click Bug Report (in the Contact block).
- The app captures a screenshot in the background (the bug report modal itself is not included).
- Draw on the image — arrows, circles, highlights. Made a mistake? Clear drawing. Want a fresh capture? New screenshot.
- Briefly describe in the textarea what you observed and what you expected to happen.
- Send bug report — the image, description, and your profile details (name, email, group, device user-agent) are sent to the developers.
What we don't send
The screenshot shows your current screen — whatever is visible there. Your password is never stored in any form (and isn't needed — you sign in with Google). You can draw over any part of the image you'd prefer not to share before hitting Send.
If you can't reproduce the bug at the exact moment you open the bug report (e.g. the modal closed in between), just describe step by step what you did — the developer can still trace the issue through your profile logs.
Cleaner, bilingual login
The login screen has been completely redesigned: a welcome headline, two proof points, a HU / EN toggle, and a prominent Google sign-in button. Projector pairing (QR scan) is available without signing in.
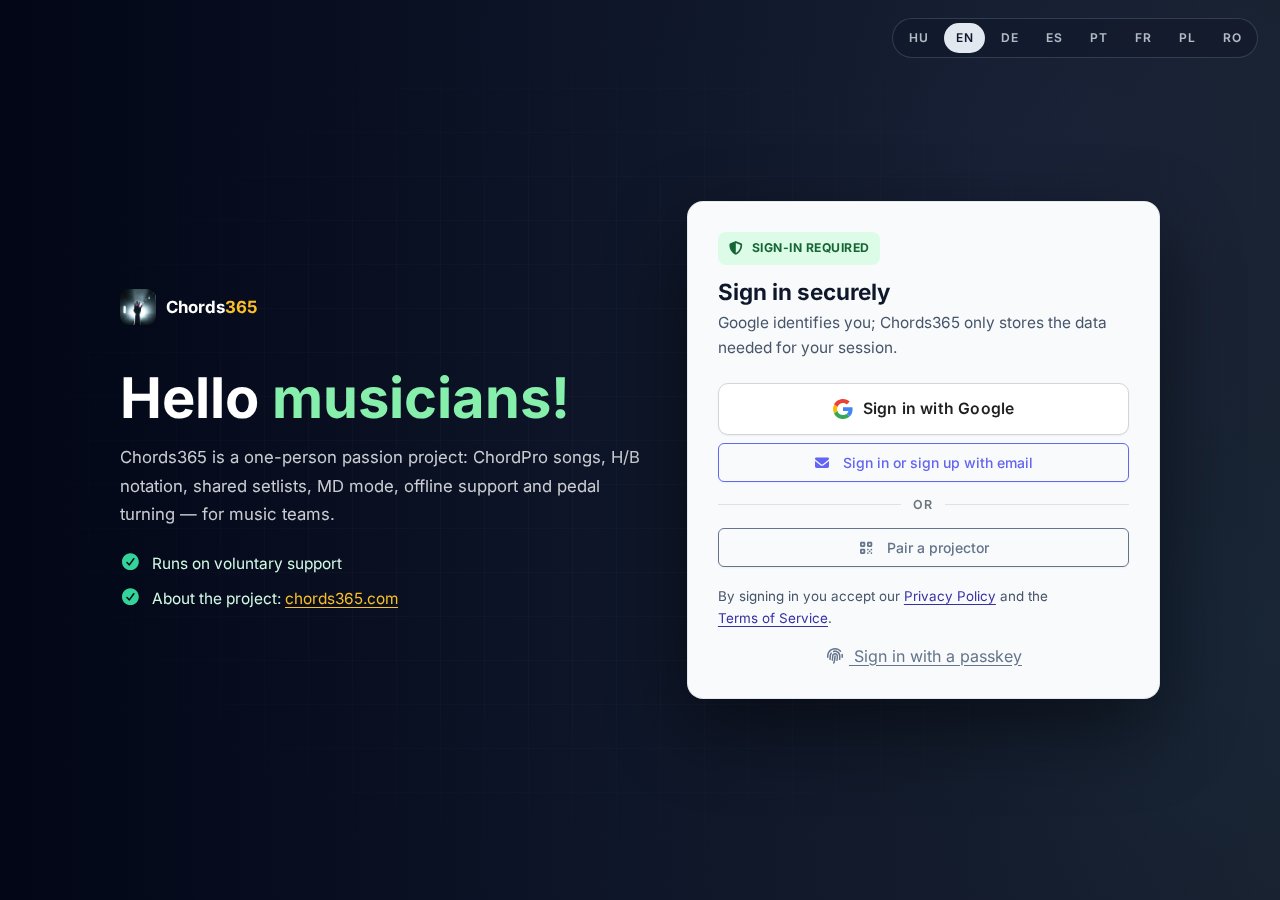
What you see
- Hero — "Hey musicians!" and a short description of the app.
- Proof list — supported by voluntary contributions; link to the chords365.com public site.
- Sign-in card — security badge, "Sign in securely", large Sign in with Google button.
- Or — below that, the Pair projector button (QR scan for devices that only need to function as a display, without signing in).
- Privacy policy and Terms of Service links at the bottom of the card.
Quick sign-in (One Tap)
In supported browsers, if you're already signed into a Google account, a One Tap card may appear automatically on the login page — sign in with a single tap, no full Google redirect needed. If it doesn't appear (e.g. no active Google session, or the browser blocks it), no problem: the Sign in with Google button always works.
Sign in with a passkey (passwordless)
Below the Google button, the Sign in with passkey button lets you sign in without a password, using your device's biometrics or PIN — provided you've already set up a passkey. You can add a passkey in Settings → Account while signed in (you can also rename or delete them there). You can register without a Google account too: on the login card, enter your email address, type in the confirmation code you receive, and then create your passkey. The passkey is tied to the device and browser where you created it.
Language selection before signing in
The HU / EN toggle in the top-right corner switches the language of the entire login flow — including the redirect screen after Google authentication. Your choice is remembered for future visits.
Projector use without signing in
If you want to use a device purely as a display (e.g. a shared projector machine), you don't need to sign in with a Google account. Tap Pair projector → scan the QR code with your own phone → the projector screen comes under your control. The projector device doesn't need a personal account and stores no personal data.
Shared file storage for your group
The Media Library is your group's shared, collaborative file store — upload and share recordings, sheet music, images, and documents. Think of it as group-level cloud storage, built right into Chords365.
Where to find it
Open the Menu modal in the global header and tap Media Library in the Navigation section (only visible if you belong to a group). It opens at /media-library.
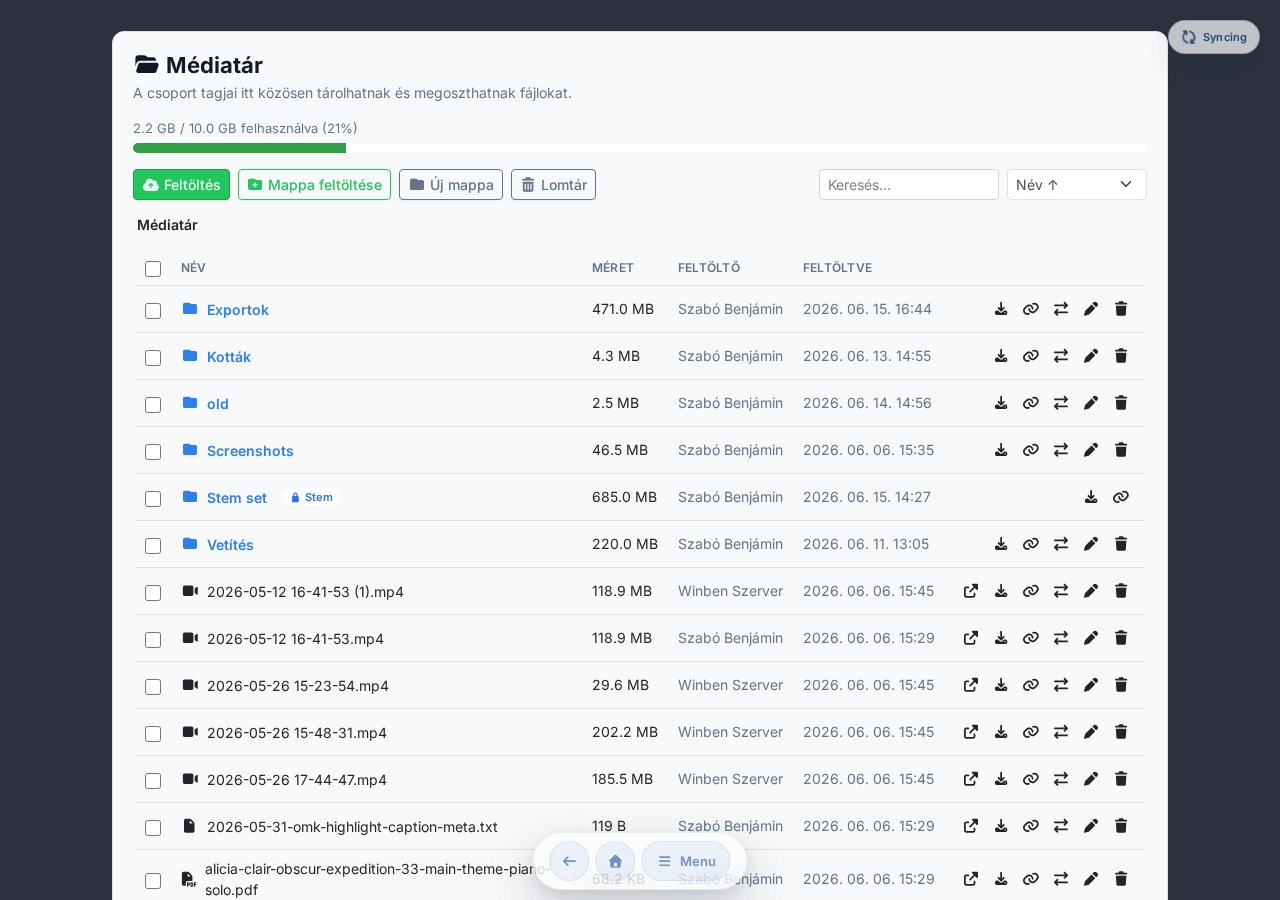
Storage quota
A bar at the top of the page shows your group's used vs. total storage (e.g. 920 MB / 10 GB). As you approach the limit you'll receive a warning; when it's full, no new uploads can start until you free up space (by deleting files or emptying the trash).
Uploading
- Drag and drop files — or an entire folder with its subdirectories — onto the page; the folder structure is preserved.
- Or use the Upload / Upload folder button to open the file or folder picker.
- Large files upload in chunks; a progress bar shows the status of each upload.
Folders and browsing
Content can be organised into folders. Use the New folder button to create one; the breadcrumb trail at the top always shows where you are — click any parent folder to navigate back.
Search and sort
Use the Search field in the top-right to filter by name; use the sort dropdown to order the list by name, date (newest / oldest), or size.
File actions
Icons appear at the end of each file row:
- Open — opens a built-in preview page. Images, videos, and audio files can be viewed or played directly; other types can be opened in a new tab or downloaded.
- Download — saves the file to your device.
- Copy link — copies a shareable link to the clipboard (only members of the same group can open it).
- Move — moves the file or folder to another location (see below).
- Rename and Delete — available for your own uploads and for group admins.
Move and bulk actions
Move a single file or folder using the Move icon at the end of its row. In the destination picker that opens, browse folders using the breadcrumb trail, and if needed create a new folder right there — then click "Move here: …" to complete the move. Links pointing to the file (e.g. a shared link or a projection background) remain valid after the move.
You can also work with multiple items at once: tick the checkboxes at the start of each row to select multiple files and folders; a bulk-action bar then appears at the top:
- Download as ZIP — selected items (folders including all their contents) packed into a single ZIP.
- Move — moves all selected items to a common destination folder.
- Delete — sends all selected items to the trash.
If a file is used elsewhere by the group — for example as the projection background or logo — a small badge appears in the list, and you'll see a warning before deleting so the projection doesn't accidentally lose its setting. (Moving is always safe: the reference is preserved.)
Trash
Deleted files aren't gone immediately — they go to the Trash (the Trash button in the toolbar). From there they can be restored or permanently deleted. Items in the trash still count against the storage quota until permanently removed.
The Media Library is separate for each group, and only group members can access it — shared links are likewise only openable by group members. The shared file store requires an internet connection: when offline, the page indicates that the Media Library is unavailable.
Common questions and minor issues
I can't see a new song in the library
- Check that you're in the right group.
- The library shows Favourites at the top by default; expand the full collection with the "Show N more songs from the full collection" button. If the Favourites filter chip in the filter bar is active, only favourites are shown — turn it off if you're looking for something else.
- Is the search box empty? It may have filtered the list.
Note naming is wrong (H/B)
Settings → General → Note naming — choose Hungarian (H) or Anglo-Saxon (B). The choice syncs across devices. (It can also be changed quickly from the Appearance modal on the song page, under the Chords section.)
The pedal isn't responding
- Check that the Bluetooth pedal is paired at the system level.
- In Settings → Features → Pedal / keyboard support, make sure the Enabled on song page toggle is on.
- Try the Custom profile — record the pedal's key code manually.
"Unsubmitted changes" message
Settings → Unsubmitted changes lists operations that failed to save due to a persistent error (conflict, permission issue, or invalid data). Try the [Retry] button, or [Discard] if the change is no longer relevant.
The app is loading slowly
- On the first render of the calendar there is an intentional 1.25-second delay (to speed up the initial boot) — this is normal.
- Try signing out and back in.
- On mobile, try clearing the browser cache.
My own buttons in the member modal are disabled
This is intentional: you can't demote yourself from admin or remove yourself from the group. Another admin needs to do that.
Need more help?
Fastest route: the Bug Report button in the menu — it automatically attaches a screenshot of what you're seeing and your profile details; you just need to write one sentence about what happened.
Or: email us at [email protected] · feedback form: form · status: uptime.